If you’re an avid video PC gamer, you’ll consider many factors that will affect your gameplay. One of them is the frames per second (FPS) rate, which is the count of the number of frames displayed per second.
This rate determines how smooth the game is, as it largely depends on your system hardware and software drivers. Since it is a decisive factor in effective gameplay, having a higher FPS count is an excellent must-have.
How does Windows 10 check the FPS rate of a game? While you may use multiple third-party applications or plugins to check your current FPS rate, note that Microsoft has a built-in FPS counter that shows the number of frames changing per second. Here’s how to enable it;
Steps to view FPS in any Windows 10 game (no additional software required)
Windows 10 has a dedicated game settings and stats section called the Windows Game Bar, where you can set or change all of them. To see the FPS rate of any game,
- Press the Windows + G shortcut on your keyboard to go to the Windows Game Bar, or search for it in the Start menu.
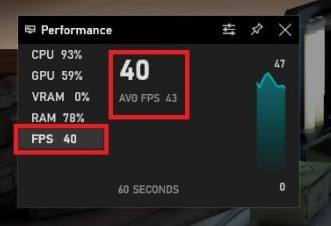
- Here, look for the FPS settings under the Performance tab and left-click on it and it will see a prompt to reboot to enable it.
- Before that, select the “Request Access” button and proceed to reboot your system.


How does Windows 10 check the FPS rate of a game? That’s it. After you restart, open the game you want along with the Windows Game Bar. When you see all the settings displayed, launching the game will make all the tabs disappear except for the Performance tab. Here, you can see the real-time FPS count while playing.
You can move tabs to any part of the screen to avoid being disturbed. In addition to the FPS count, you can also see the RAM, CPU, GPU, and vRAM consumption rates.