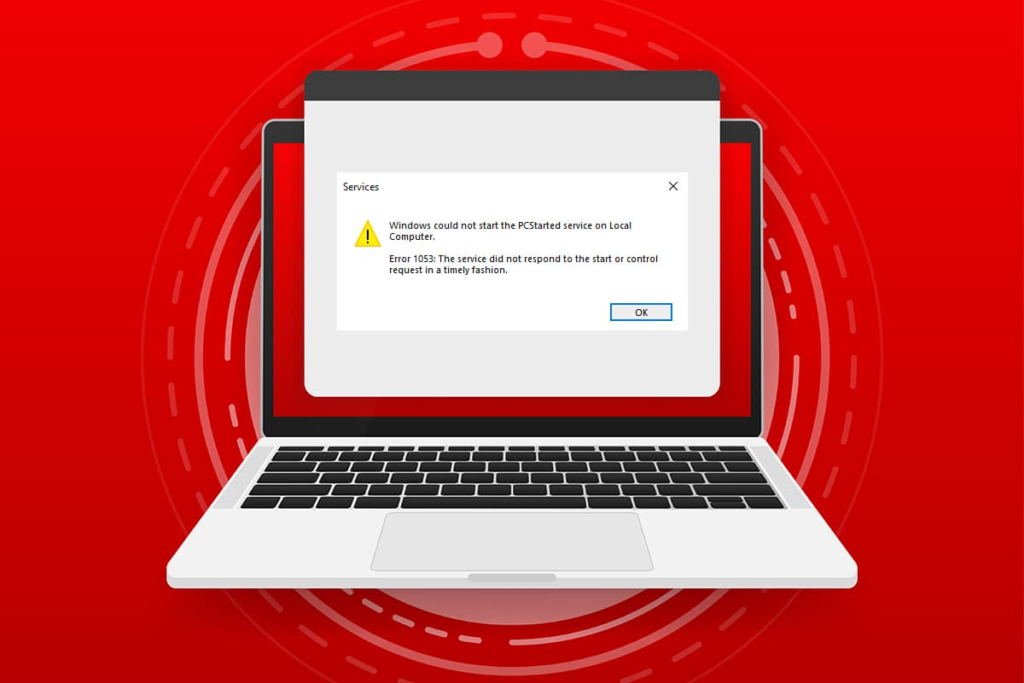
When you try to start a service on your PC, but if your service refuses to respond within the time window, you’ll face error 1053: The service didn’t respond to a startup or control request in a timely manner. You may encounter errors in many variants, and you may not be able to launch a custom service. Unfortunately, very few developers report frequent service error 1053 in their PCs when trying to develop any custom software. In this guide, you’ll learn what causes the error message, and how to troubleshoot the problem. So, keep reading!
How to Fix Windows 10 Service Error 1053
Error 1053: The service does not respond to the launch or control request in a timely manner, which occurs in Windows 10 whenever there is a timeout response to a specific request.
- If your application or service doesn’t meet the default preference for the timeout setting, you’ll face service error 1053. Adjusting the registry key can manipulate the settings and thus solve the problem.
- If your PC doesn’t have the necessary DLLs and system data files, you may face service error 1053. The file is corrupted or altered, and when important data is not available, you will face service error 1053.
- The presence of malware can lead to data loss, which leads to service error 1053. Running an antivirus scan may remove all harmful data from your PC and prevent your data from being altered or corrupted.
- The affected system files may be due to corrupted Windows Update. If your operating system is outdated, corrupted data and errors (if any) will remain in your PC, resulting in service error 1053. Always make sure you’re using a newer version of Windows to resolve any type of issue.
- If the installation file is corrupted, the files and folders are not properly configured, and the administrator privileges of the application are issues, it can cause service error 1053. To fix this issue, reinstall any specific app that is causing the error.
However, if you’re confused about the procedure for eliminating error 1053: The service did not respond to the start or control request in a timely manner, then you’re not alone!
This section summarizes the full list of ways to fix Error 1053: The service is not responding. Make sure you follow the listed methods in the same order to get the best results.
Method 1: Perform a clean start
Workaround for Windows 10 Service Error 1053: Problems with Error 1053: The service is not responding and can be fixed by a clean boot of all essential services and files in the Windows 10 system, as described in this method.
Note: Make sure you’re logged in as an administrator to perform a Windows clean boot.
1. Launch the Run dialog box by pressing the Windows + R keys at the same time.
2. Enter msconfig and click the OK button to open System Configuration.

3. The system configuration window will appear. Next, switch to the Services tab.
4. Check the box next to Hide all Microsoft services and click the Disable All button as highlighted in the image.
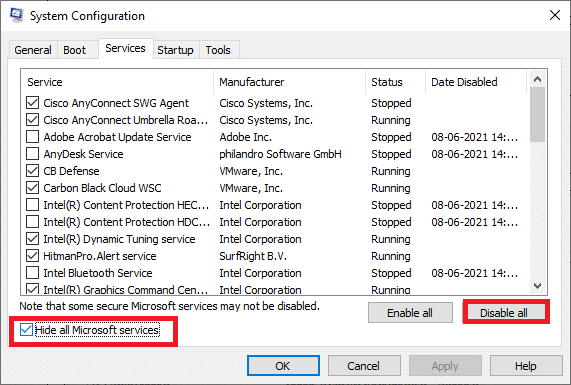
5. Now, switch to the startup tab and click on the link to open the Task Manager as shown in the image below.

6. The Task Manager window will now pop up. Switch to the Launch tab.
7. Next, select the startup task that you don’t need and click Disable on the bottom right corner.
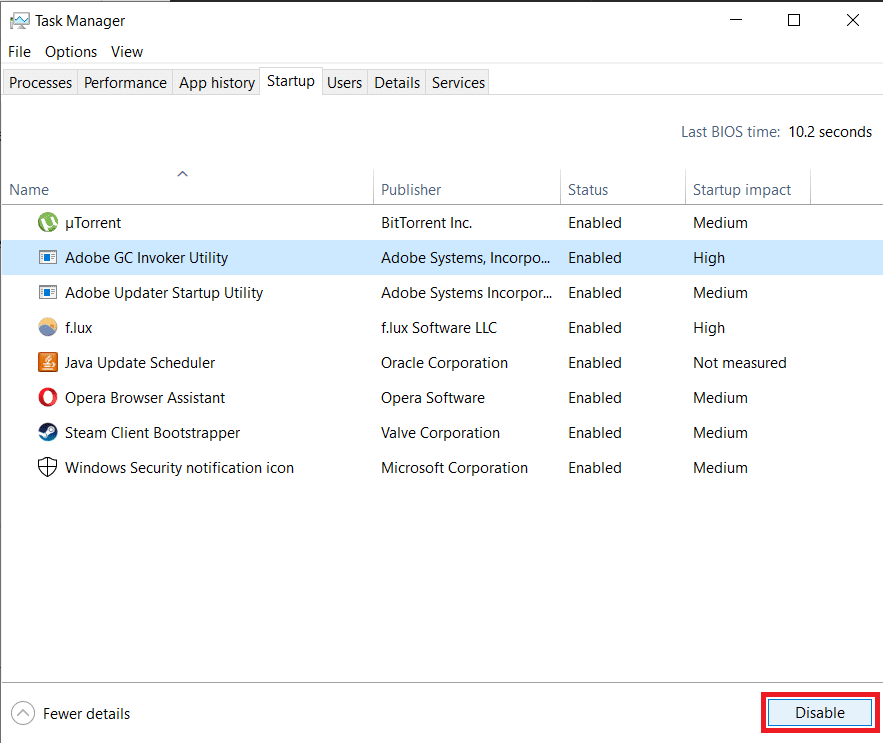
8. Exit the Task Manager and System Configuration window.
9. Now, press Alt+F4 at the same time. You’ll see a pop-up window as shown below.

10. Now, click on the drop-down box and select the Restart option.
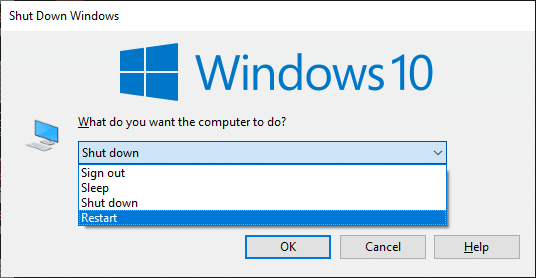
11. Finally, press Enter or click OK to reboot the system.
Method 2: Adjust the timeout settings
Windows 10 Service Error 1053 Repair Tutorial: To resolve Service Error 1053, the main step is to change the timeout setting through the Registry Editor. Whenever you try to start the service, the time range starts with the default value. If the response time doesn’t meet this time frame, you’ll face error 1053: The service didn’t respond to the launch or control request in a timely manner. Now, in this troubleshooting method, you can change the registry value for the time range, and if it doesn’t exist, you’ll create the same value. Here’s how to do it.
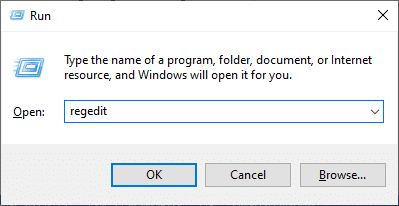
1. Press and hold the Windows + R keys at the same time to open the run dialog box.
2. Now type regedit and press Enter key to launch the registry editor.
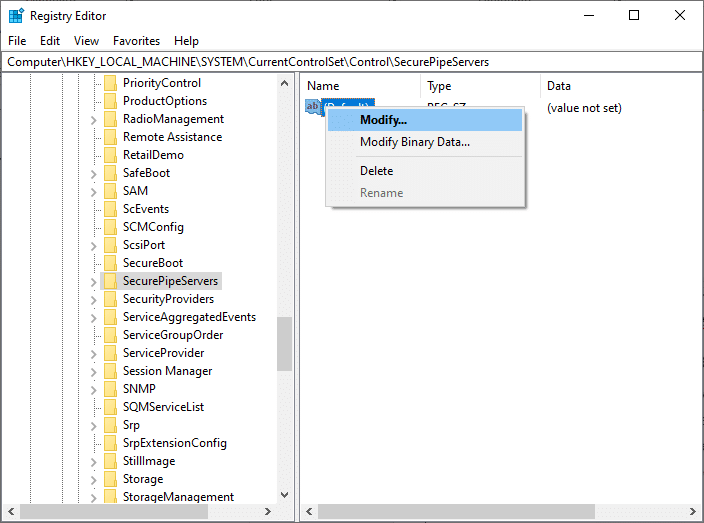
3. Navigate to the following critical folder path from the address bar.ComputerHKEY_LOCAL_MACHINESYSTEMCurrentControlSetControlSecurePipeServers
4A。 If you don’t find SecurePipeServers in the Control folder, right-click the space in the right pane and click New > DWORD (32-bit) Value.

4B。 If you have SecurePipeServers in the Control folder, right-click the Default key in the right pane and select the Modify option.
5. Set the numeric data to 18000 as shown in the image.
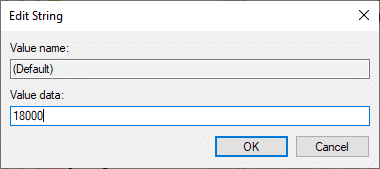
6. Save your changes and restart your PC.
Now check to see if you’ve fixed Error 1053: Service didn’t respond to startup or control requests in a timely manner.
Method 3: Repair System Files
Corrupted files and folders in your PC usually lead to service error 1053. Follow the instructions of this method to analyze your PC via SFC-DISM command if there are any corrupted files causing error. So, if there are any discrepancies, all the corrupted files will be automatically deleted or replaced. In addition, it is a built-in tool that lets users delete files and fix service error 1053. Also, follow the steps below to do the same.
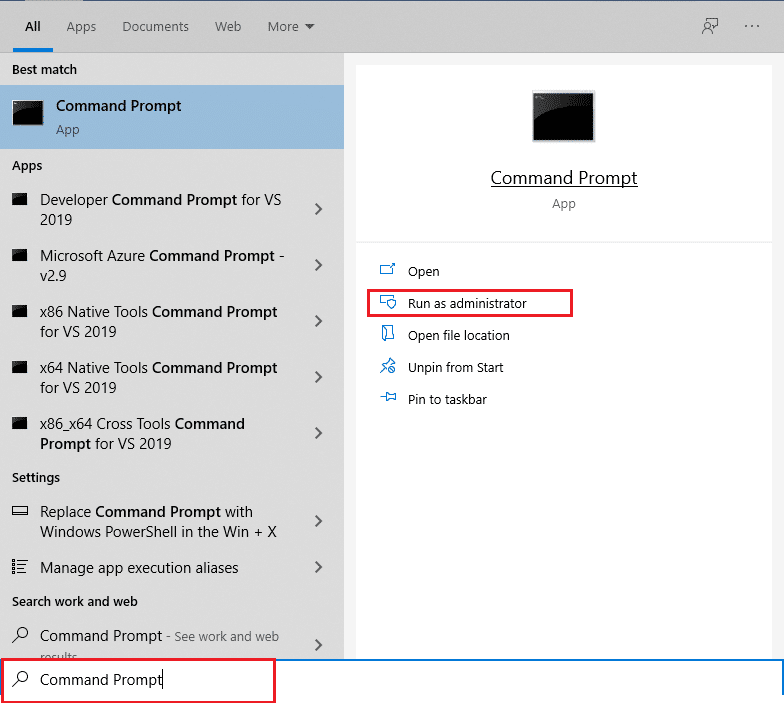
1. Press the Windows key, type Command Prompt and click Run as Administrator.
2. Click Yes in the User Account Control prompt.
3. Type the chkdsk C: /f /r /x command and press Enter.

4. If you are prompted, Chkdsk cannot run… the volume is… in use process, then, type Y and press Enter.
5. Type the command again: sfc /scannow and press Enter to run the System File Checker scan.
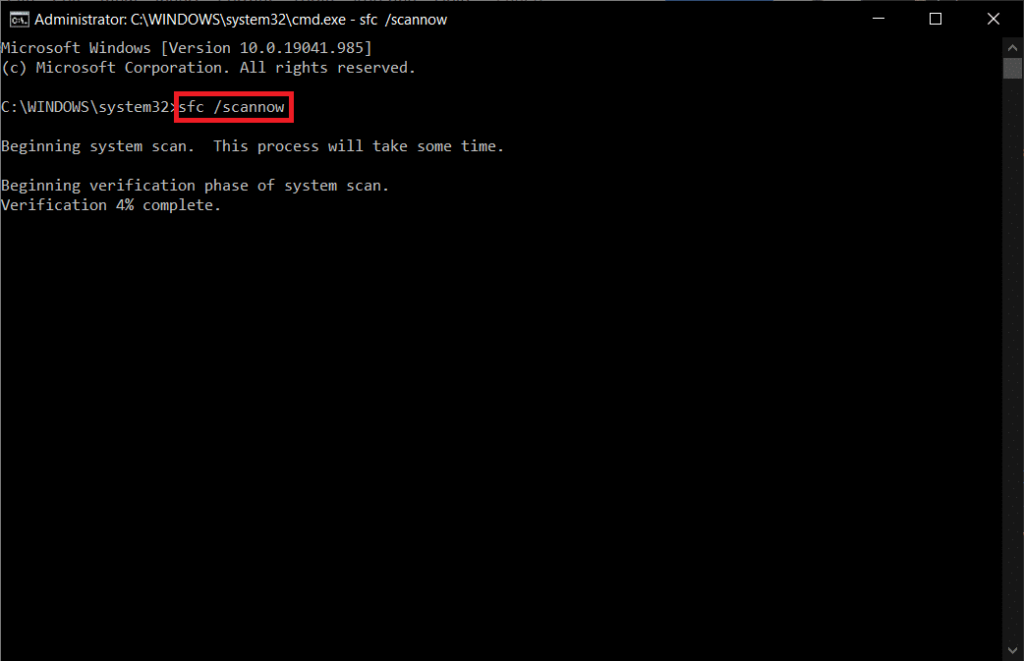
NOTE: The system scan will start and will take a few minutes to complete. In the meantime, you can continue with other activities, but be careful not to accidentally close the window.
Once the scan is complete, it will display either of the following messages:
- Windows Resource Protection didn’t find any integrity violations.
- Windows Resource Protection was unable to perform the requested operation.
- Windows Resource Protection finds corrupted files and repairs them successfully.
- Windows Resource Protection finds corrupted files, but can’t fix some of them.
6. Once the scan is complete, restart your PC.
7. Launch the Command Prompt again as an administrator and execute the given commands in turn:dism.exe /Online /cleanup-image /scanhealth dism.exe /Online /cleanup-image /restorehealth dism.exe /Online /cleanup-image /startcomponentcleanup
Note: You must have an active Internet connection to execute DISM commands correctly.

Method 4: Run a malware scan
How to Fix Windows 10 Service Error 1053? Windows Defender can help you get rid of malware. It scans and protects your system on a regular basis. So, to avoid service error 1053, run an antivirus scan on your system and check if the issue is resolved. Then, follow the steps mentioned below to do so.
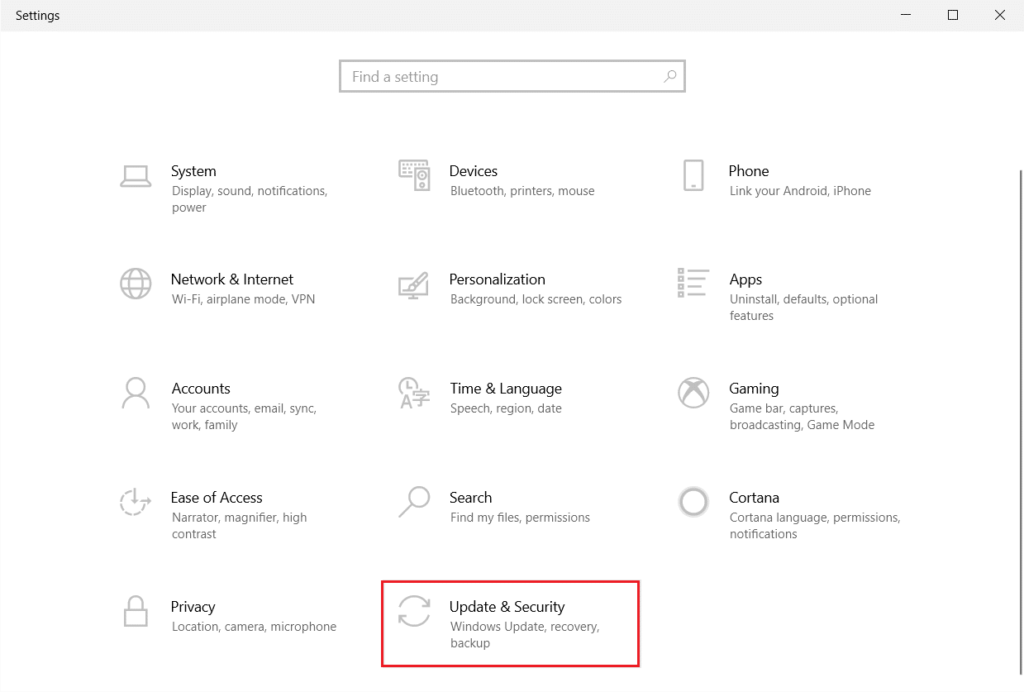
1. Press the Windows + I keys at the same time to launch the settings.
2. Here, click on the Update & Security settings as shown in the image.
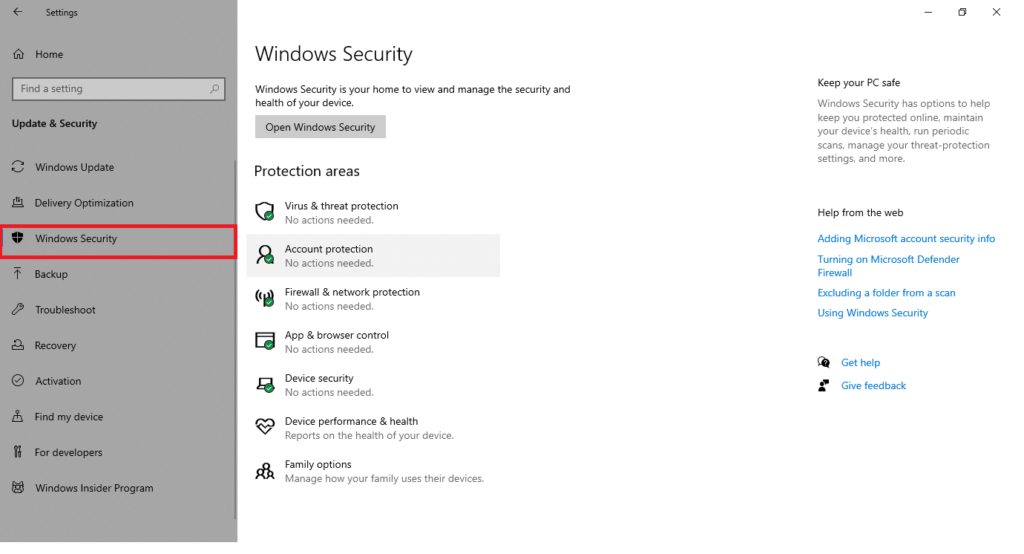
3. Go to Windows Security in the left pane.
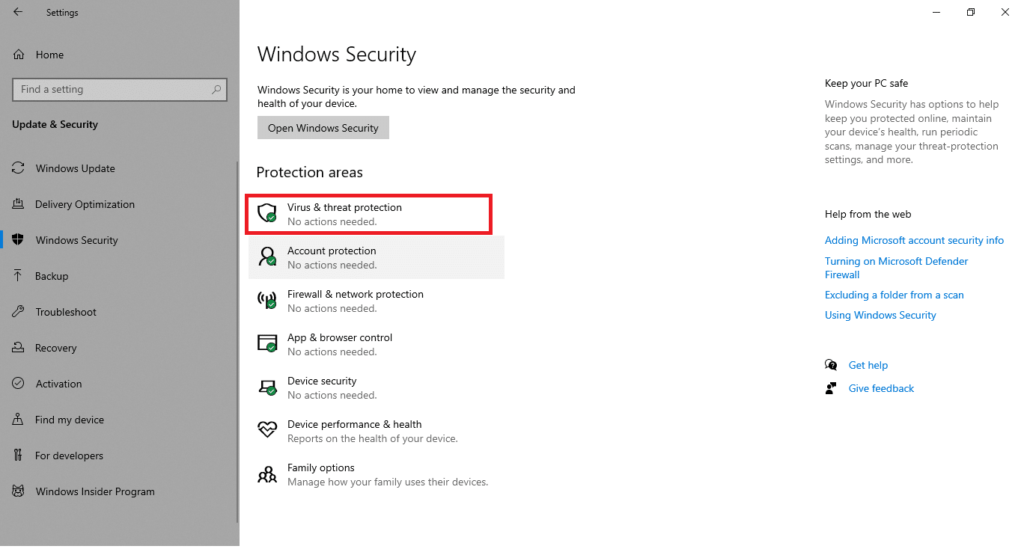
4. Click the Virus & Threat Protection option in the right pane.
5. Click the Quick Scan button to search for malware.
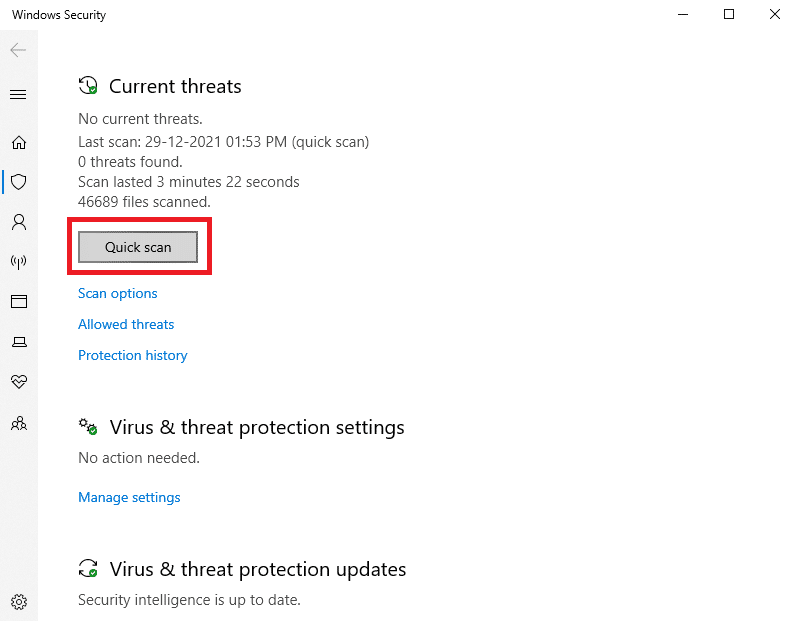
6A。 Once the scan is complete, all the threats will be displayed. Click Start Action under the current threat.

6B。 If there are no threats in your device, the device will display a No current threat alert.
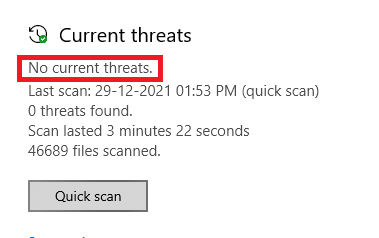
Once the scanning process is complete, Windows Defender will remove all viruses and malware programs. First, check to see if you’ve fixed error 1053: Service is not responding.
Method 5: Reset the network configuration
Workaround for Windows 10 Service Error 1053: If you’re trying to start a service that connects to the Internet for its functionality, you can try resetting your network configuration to fix Error 1053: Service Not Responding. In some cases, internet connection issues can cause the above errors, so resetting them may help you resolve the same. Here are some instructions for resetting your network configuration.
1. Press the Windows key, type Command Prompt, and click Run as Administrator.
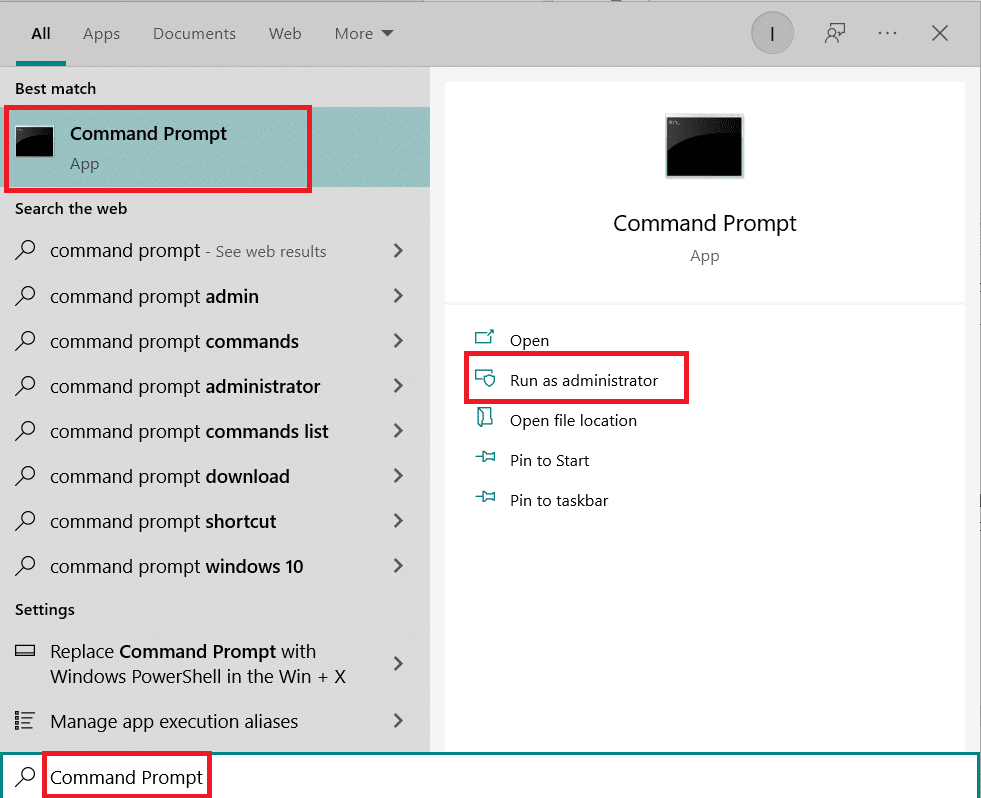
2. Now, type the following commands one by one in the command window and press Enter after each command.ipconfig /flushdns ipconfig /registerdns ipconfig /release ipconfig /renew netsh winsock reset

3. Finally, wait for the command to execute and restart your PC.
Check to see if you’ve fixed Error 1053: The service didn’t respond to the startup or control request in a timely manner.
Method 6: Change the ownership of the app
Windows 10 Service Error 1053 Repair Tutorial: This is a rare situation where you may encounter Error 1053: The service does not respond to startup or control requests in a timely manner when you don’t have any proper ownership of a particular application. If you don’t have all elevated access to the application, you won’t be able to read responses from or send responses to (system) services. This results in Error 1053: The service is not responding. You can eliminate the error by changing the ownership of the application as follows.
1. Locate the app that is causing the error and navigate to where it was installed. Right-click on the file/folder and select Properties.
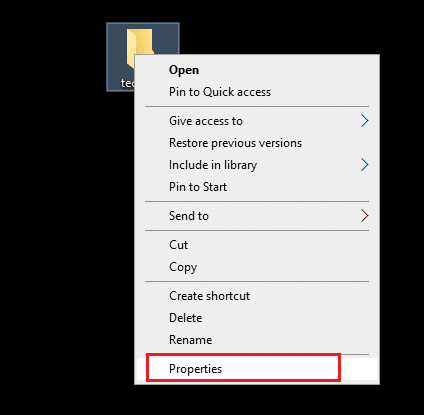
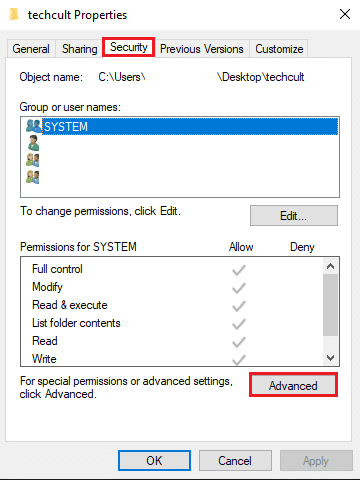
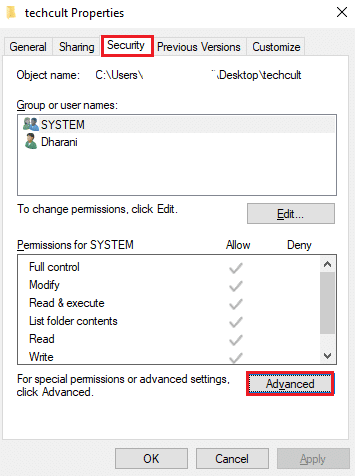
2. Now, switch to the Security tab and select the Advanced option as shown below.
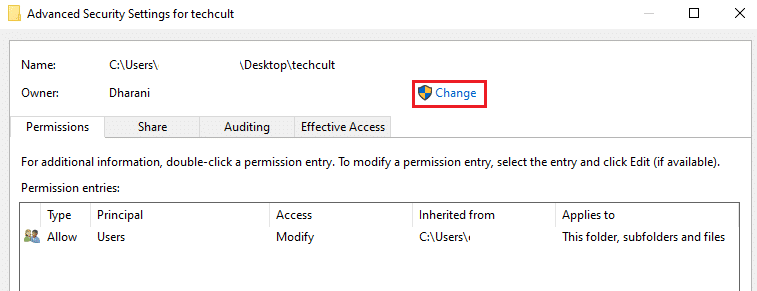
3. Now, click on the change option as shown in the image.
4. Now, type the user account name in the Enter Object Name to Select field and select the highlighted Check Name option. When you’ve found your account, click OK.
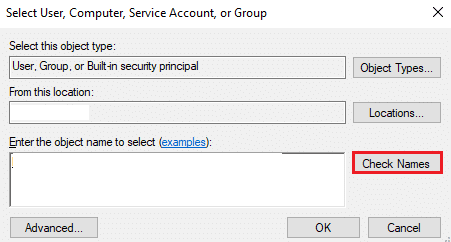
Note: When you can’t find your account name in the list, manually select it from the list of user groups. To do this, click on the Advanced option and then click on Find Now. Then, select your account from the list and click OK.
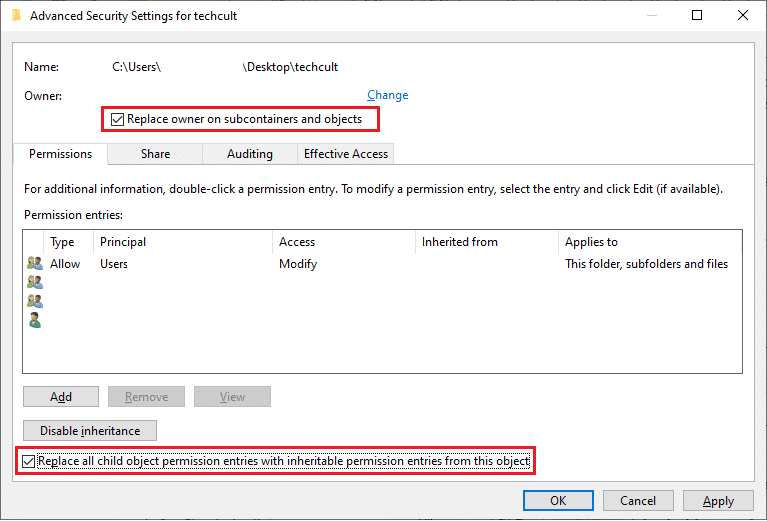
5. Now, check the following boxes in the previous window and click Apply >> OK to save the changes.
- Replace the owner of the subcontainer and object
- Replace all child object permission entries with inheritable permission entries for this object
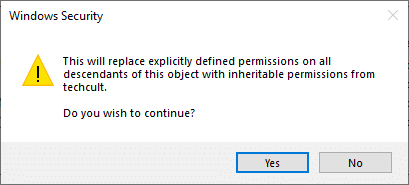
6. Click Yes to continue with the Windows Security Prompt.
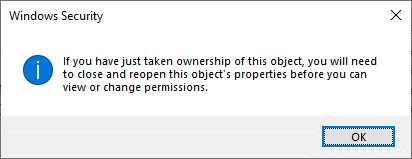
7. Click OK again to proceed.
8. Close the existing window and navigate to the Properties window. In the Security tab, click on the highlighted Advanced option.
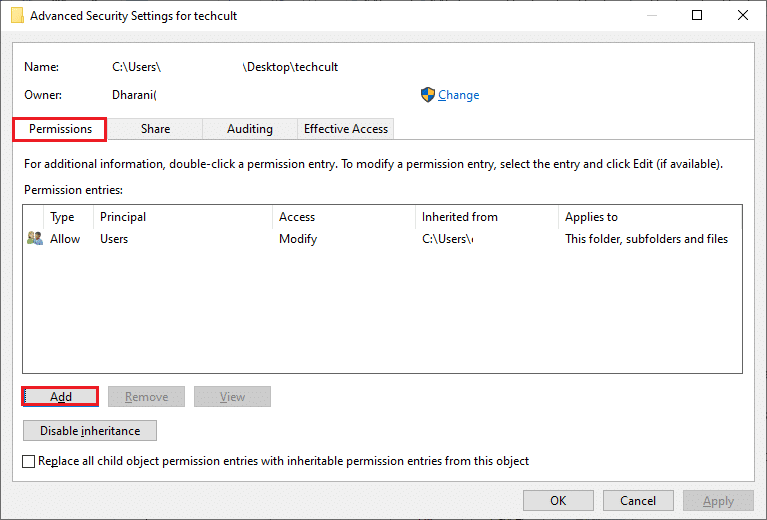
9. Here, in the Permissions tab, click on “Add as Highlight”.
10. In the next window, click Select a principal, as shown in the image.
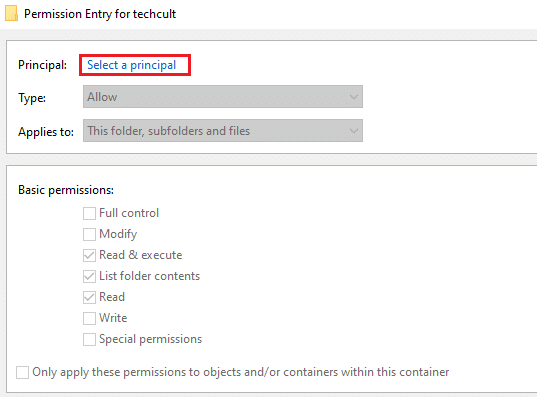
11. Now, type the user account name in the Enter the object name to select field and select the Check Names option as before and click OK.

12. Now, check all the boxes under Basic Permissions as shown in the image and click OK.

13. Now, check the Replace all child object permission entries with inheritable permission entries for this object box in the previous window.
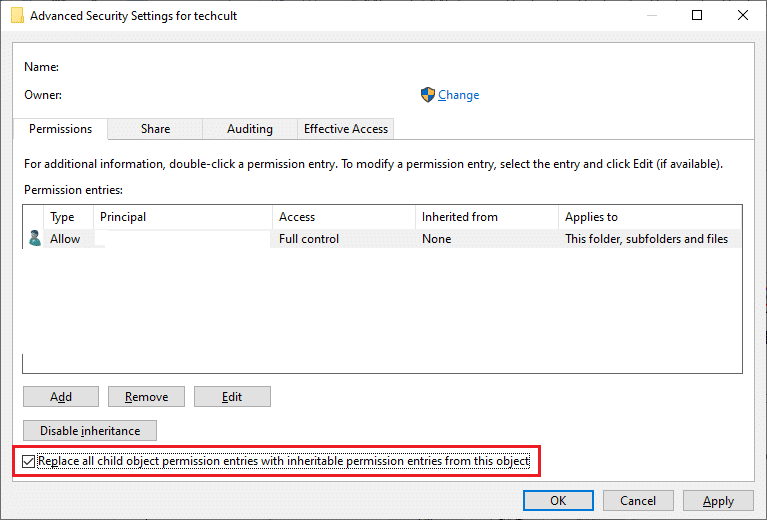
14. Click Apply > OK to save the changes and close all windows, restarting your PC.
Check to see if this fixes service error 1053 for you.
Method 7: Update Windows
How to Fix Windows 10 Service Error 1053? Installing the new update will help you fix the errors in your system. Therefore, always make sure that you are using a newer version of the system. Otherwise, the files in the system will be incompatible with the service files, resulting in Error 1053: Service is not responding. Follow the steps mentioned below to update Windows to the latest version.
1. Press the Windows + I keys at the same time to launch the settings.
2. Click the Update & Security tile, as shown in the image.
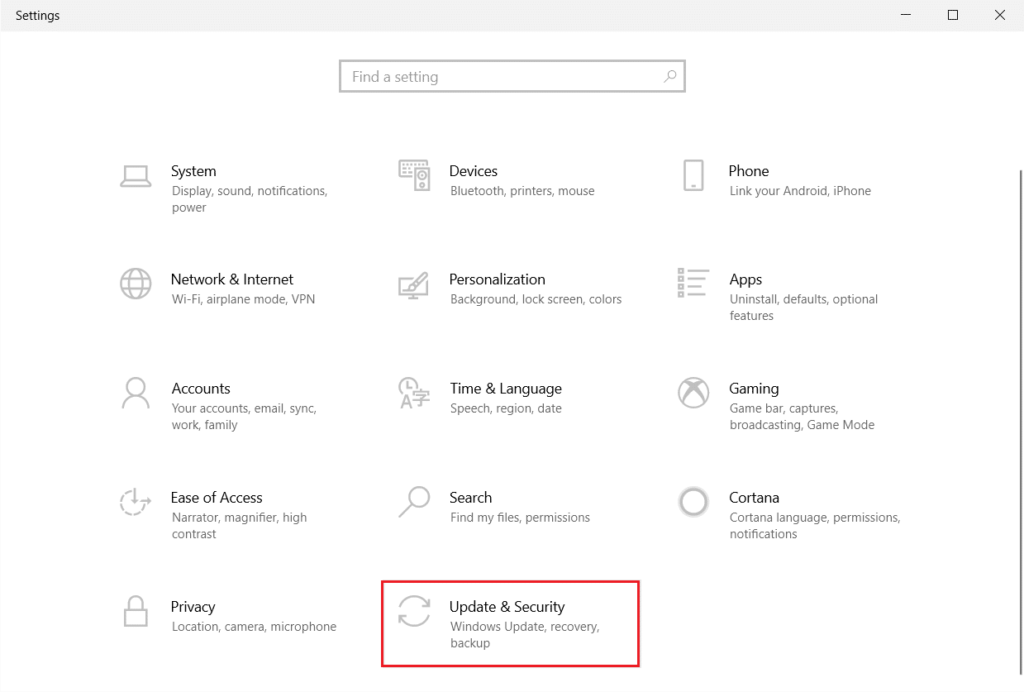
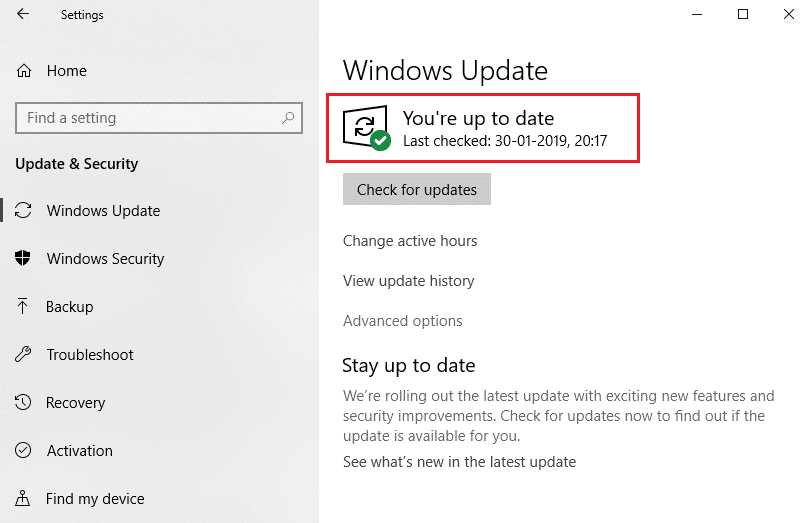
3. In the Windows Update tab, click the Check for Updates button.

4A。 If a new update is available, click Install Now and follow the instructions to update.
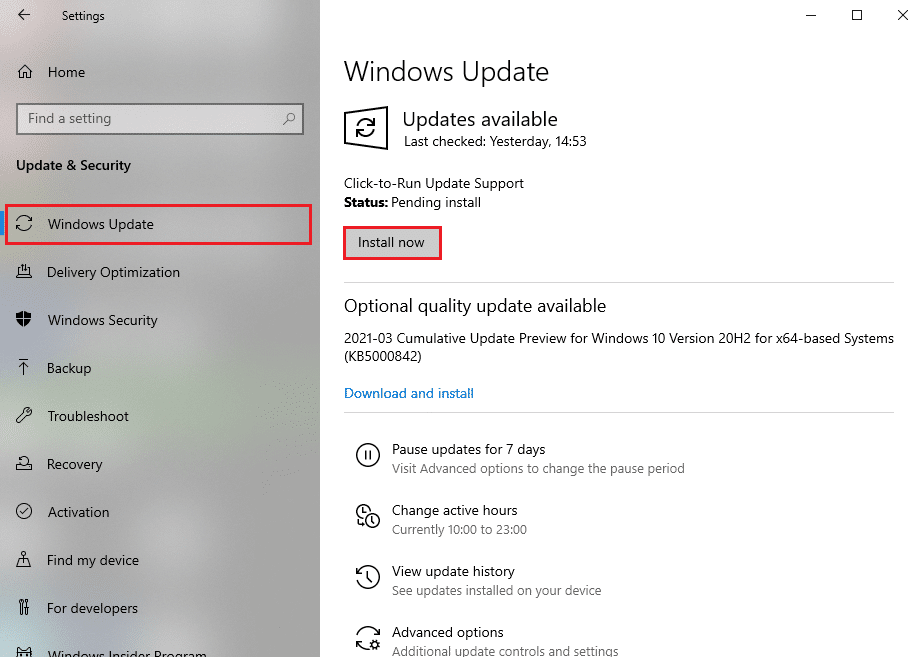
4B。 Otherwise, if Windows is up to date, then it will show the You are up to date message.
Method 8: Reinstall the app
Workaround for Windows 10 Service Error 1053: The last chance to resolve this issue is to reinstall a specific application, which throws error 1053. However, if you install any third-party apps (except those in the MS Store), the possibility of missing or corrupted components can cause the above issues. As a result, your request for the appropriate Windows service may not be answered. So, uninstall the app from your PC and re-download the latest version from its official website.
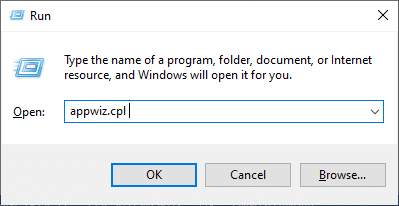
1. Launch the Run dialog box and enter appwiz.cpl. Then, click OK.
2. In the Programs & Features window, search for your application.
3. Now, click on the app and select the uninstall option.
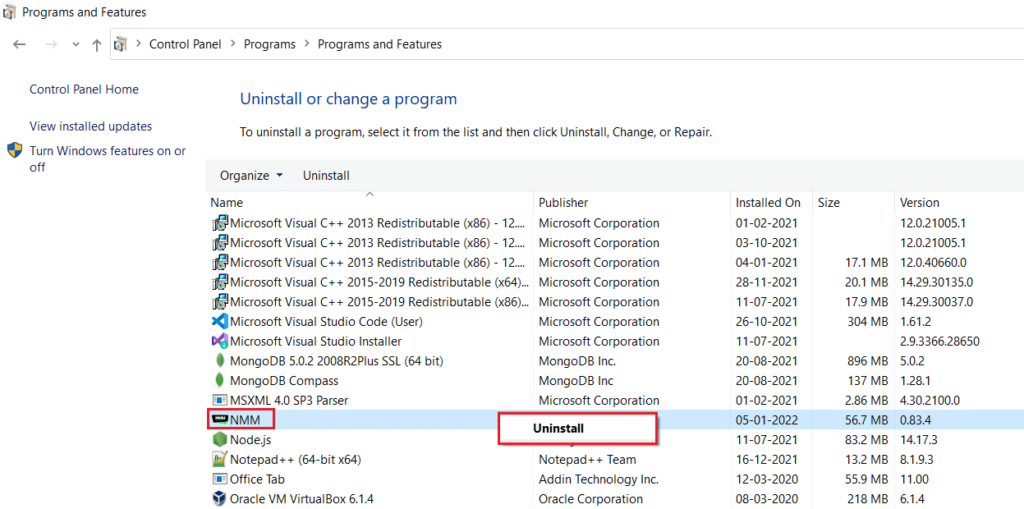
4. Now, confirm that you are sure you want to uninstall the app? Click Yes Prompt.
5. Once you have done all the steps above, restart your computer. Then, reinstall the app from their respective official websites and check if you have fixed the issue.
We hope this guide has been helpful to you and that you have been able to fix service error 1053 on Windows 10. Let us know which method works best for you. Also, if you have any questions/suggestions about this article, feel free to drop them in the comment section.