With the help of this step-by-step guide to fix the automatic repair loop that can’t fix your PC.
The Auto-Repair Utility is one of the best programs for Windows PCs that will allow you to restore your system to its original or previous source if you encounter any issues. The tool diagnoses the factors that cause system errors and helps resolve them.
But what if you don’t fix the problem, but automatically fix the problem that starts to be created? How to Fix Auto-Repair Loop in Windows 10? Sometimes, the tool may not work properly due to one or more startup errors. If you want to fix the automatic repair loop in Windows 10 that can’t fix your PC, then this article will list some of the best and effective methods.
A way to precisely fix the auto-repair loop in Windows 10
This upcoming session of this article will cover the best and safest ways to fix the automatic repair loop in Windows 10. Apply these fixes one by one until you get rid of the problem.
Fix 1: Remove the latest device
Windows 10 Auto-Repair Cycle Workaround: If you have recently connected some devices and then start facing the issue that Auto-Repair can’t fix your PC. Then you need to disconnect or remove such devices. Some newly installed devices may interrupt the work of the repair tool and cause problems.
Fix 2: Check the disk and run the System File Checker scan
If disconnection doesn’t work, you should run the System File Checker and Disk Check commands with the help of a command prompt. These commands will help you identify the exact problem behind the problem and fix the automatic repair loop in Windows 10. Here’s how:
- To launch the Windows boot troubleshooting menu, press the F8 key before Windows boots.
- From the Recovery menu, select View Advanced Repair Options.
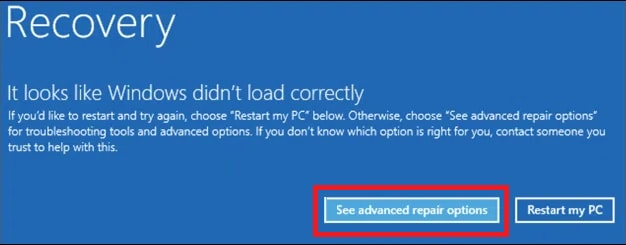
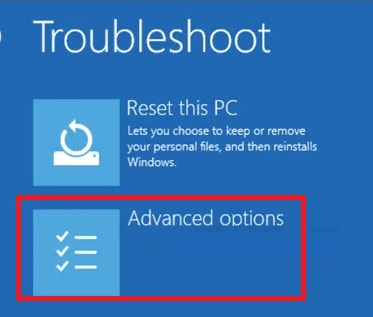
3. In the next window, click Troubleshoot.
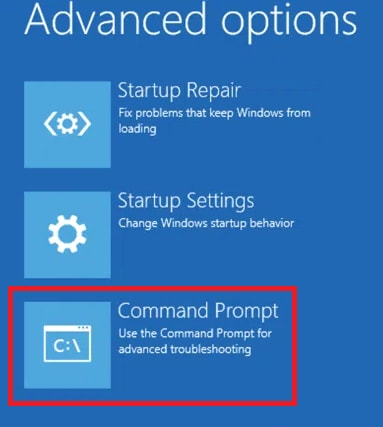
4. Now tap on the advanced options.
5. Click on the command prompt to launch the utility.

6. In the utility, type the following commands and then press Enter at the same time and wait for them to scan the system.
chkdsk /rc
SFC /scannow
Once the process is complete, all the startup issues will be resolved, and now you can boot your PC perfectly without any boot fixes that can’t fix your PC issues. The scan will recover and replace the lost files on your PC to make it run smoothly.
Fix 3: Repair the Windows registry
How to Fix Auto-Repair Loop in Windows 10? If the above process doesn’t work, you should repair and restore the Windows registry. When the registry is restored to its previous state, the PC will easily run as it pleases. With the help of the steps listed below, recover the Windows registry via the boot menu:
- Launch the Command Prompt with the help of the steps explained earlier.
2. Type the command provided below and press Enter.
C:\Windows\System32\config\regback
C:\Windows\System32\config\
3. Windows might ask you to overwrite these files. Type yes and hit enter.
Once the process is complete, you can easily restart your PC without any boot issues. If the problem with Windows 10 AutoRepair not fixing your PC persists, follow the next method.
Fix 4: With Deployment Image Servicing and Management (DISM)
Windows 10 Auto-Repair Cycle Workaround: If the above solutions don’t work, you can also scan your system for Deployment Image Servicing and Management (DISM). This scan will repair corrupted files on your system. Follow these steps to do this:
- Launch the advanced options as before.
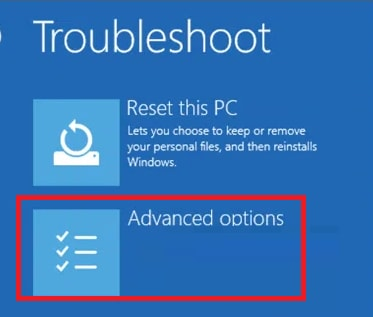
2. Click “Startup Settings”.
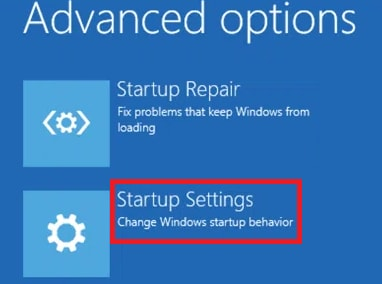
3. Restart your computer.
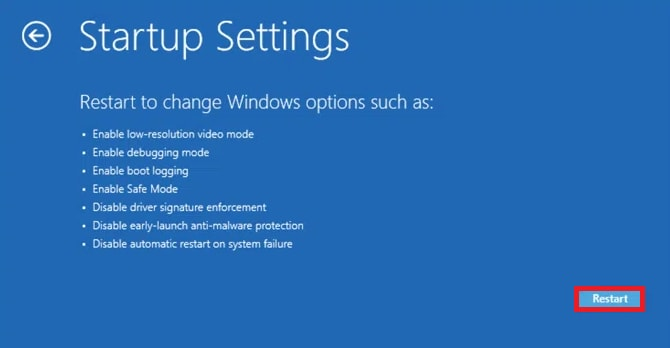
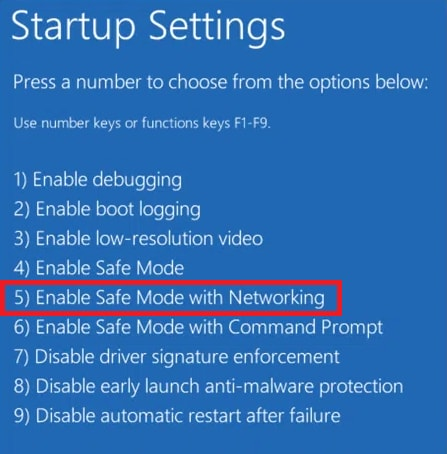
4. Press F5 to enable Safe Mode with Network Connectivity.
5. After the system restarts, search for Windows Powershell Admin and run the utility.
6. Type the command and press Enter.
DISM /Online /Cleanup-Image /RestoreHealth
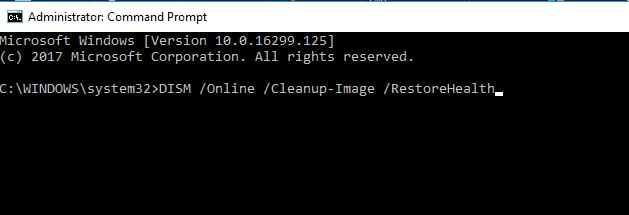
7. Now enter the following command and press Enter.
SFC/Scan

Once the scan is complete, reboot the system. You will get the perfect answer on how to fix AutoRepair not fixing your PC Windows 10.
Fix 5: Try limiting the boot loop
How to Fix Auto-Repair Loop in Windows 10? The next thing you can try to fix the automatic repair loop in Windows 10 that can’t fix your PC is to limit the boot loop. Do this with the help of the following steps:
- Launch the Command Prompt as before.
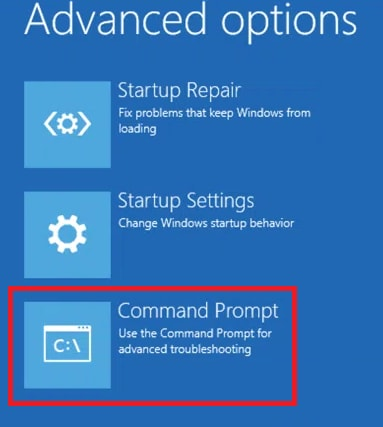
2. Enter the command bcdedit, check whether the value of recoveryenabled is yes or no, if yes, enter this command to change it to no.
bcdedit /set {default} recoveryenabled no

Once the process is complete, close the window and launch the window perfectly. Now you won’t face Windows 10 Auto Repair unable to fix your PC.
Fix 6: Reset Windows
How to Fix Auto-Repair Loop in Windows 10? If none of the methods listed above can fix the automatic repair loop in Windows 10 on your PC. Then you need to reset Windows. Resetting the device will clear all settings or applications that force the utility cycle. Follow the steps listed below to take a break from Windows:
- Start the troubleshooter as before.
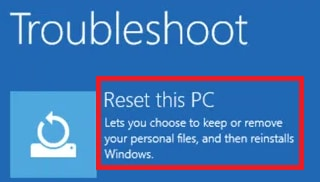
- Select the option called Reset this PC.
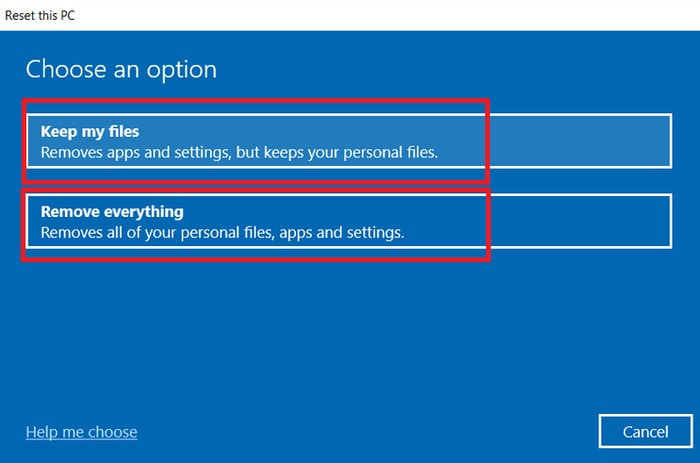
3. Now choose to keep my files or delete everything according to your need.
4. Follow the on-screen instructions to reset your PC.
After you reset your PC, set up a new device according to your requirements. Now you won’t face the issue that Startup Repair can’t fix your PC.
Summary of Windows 10 Auto-Repair Cycle Workarounds
So, these are some of the easy ways in Windows 10 that can’t fix your PC’s auto-repair loop. With one or more of these methods, you can easily boot the system.
The repair screen doesn’t loop and you can use the PC as intended. For the sake of precision, we recommend that you perform these methods together and apply the fix in the same way.