Are you facing internet issues or DNS caching issues? You can try clearing your Windows DNS cache to get Chrome back up to work. When you type in the website you want to visit, your browser automatically goes to a DNS (Domain Name System) server. Here, it searches for the IP address of the website where you entered the name in the URL and then directs you to the website.
What basically happens here is that the system stores the DNS server address for faster browsing, so it doesn’t check the DNS every time.
As a result, the DNS cache contains all the information about the web server location of the web pages you have visited in the past. So, if the location of any of these servers changes and isn’t stored in the DNS cache, you won’t be able to access that web page or website.
The DNS cache should be deleted in the following cases:
- You’re getting an error related to “Website not found”.
- When you can’t access a web page you’ve visited before.
It is important to clear the DNS cache from the system for the following reasons:
- Delete browsing history that can be misused by hackers
- Avoid DNS cache spoofing that can misuse logins and other secure user data.
- The DNS cache can sometimes get corrupted
- DNS caches become obsolete over time.
How do I clear DNS cache in Windows? There are three ways you can clear the DNS cache in Windows 10. The methods given below also apply to Windows 8, 7, and XP. Let’s take a look at each of them:
Quick overview
- Use the command line to flush the Windows DNS cache
- Use Windows PowerShell to clear the DNS cache
- A shortcut to clear the DNS cache
- How do I check if my DNS cache is cleared?
- How to turn DNS caching on or off
Use the command line to flush the Windows DNS cache
Here’s how Windows clears the DNS cache:
1) Type CMD in the left corner of the Windows screen and press Enter
2) Type ipconfig /flushdns and press Enter.
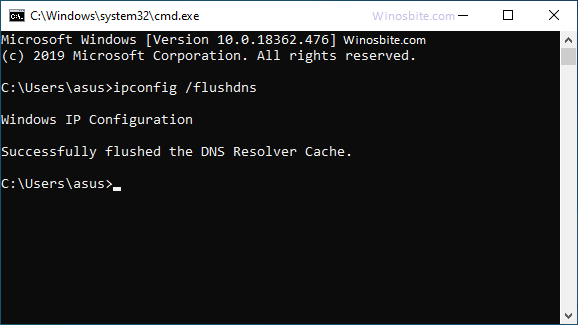
3) Once you receive the message “Successfully flushed the DNS Resolver Cache“, type exit and press Enter again.
This will clear the DNS cache on your Windows 10 system, and you can start browsing the internet using your favorite browser, such as Chrome or Mozilla.
Use Windows PowerShell to clear the DNS cache
1) Enter Powershell in the Cortana search box and tap it

2) Once the PowerShell window opens, type Clear-DnsClientCache and press Enter.

3) Close the Powershell window after successfully clearing the DNS cache.
A shortcut to clear the DNS cache
How do I clear DNS cache in Windows? Another easy and easiest way to remove the DNS cache from your system is to follow these 2 steps
1) Press the Windows+R button at the same time
2) Enter ipconfig /flushdns and click the OK button
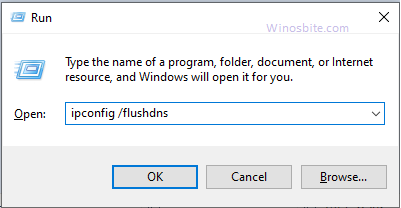
This method works with Windows 10, 8, 7, and XP.
How do I check if my DNS cache is cleared?
How to clear the DNS cache in Windows: Once you have cleared the DNS cache and want to reconfirm if it works, then type in the following command line and press Enter:ipconfig /displaydns
This will display a list of DNS cache entries, if stored.
How to turn DNS caching on or off
There is an option to turn DNS cache on or off, all you have to do is type the following line in the command prompt:
Check off:net stop dnscache
Open it:net start dnscache