Wi-Fi (WLAN) cards are standard on most laptops. Instead of an extension cable, you can get a USB Wi-Fi dongle for a separate PC. If the machine is configured, the computer can search for nearby Wi-Fi networks and connect to them. Many customers have complained that when they look at the list of available networks, they see a warning that the Wi-Fi network is not found, even though they should see at least one network. If you’re trying to connect to the Internet on your Windows 10 PC and can’t find any open Wi-Fi networks, we can help. We have brought you a perfect guide that will fix WiFi networks that are not found to have issues with Windows 10. So, keep reading!
How to Fix Windows 10 Not Finding WiFi Network
Wi-Fi network card drivers typically cause this issue on Windows 10. Other reasons for this issue are listed below.
- Incompatible or outdated network drivers.
- Airplane mode is on.
- Antivirus inference.
- VPN failures.
- Misconfigured Wi-Fi adapter settings.
- Unstable internet connection.
Basic troubleshooting tips
Windows 10 Not Found WiFi Network Repair Tutorial: Follow these basic troubleshooting tips before fixing WiFi network not found in Windows 10 with advanced methods.
- Restart your computer.
- Create a hotspot on your phone and try to connect to it.
- Connect to Wi-Fi using other devices in your home, such as smartphones. It doesn’t make a difference whether you’re using Windows 10 or another operating system.
- Try moving your workstation or adding more access points to your network to increase your router’s signal.
- Restart your router if needed.
- Press and hold the power button for a few seconds.
- Wait at least 30 seconds before proceeding.
- Press the power button again to turn it back on.
- Check that Wi-Fi is turned on in Windows 10.
- Check if your laptop is in airplane mode.
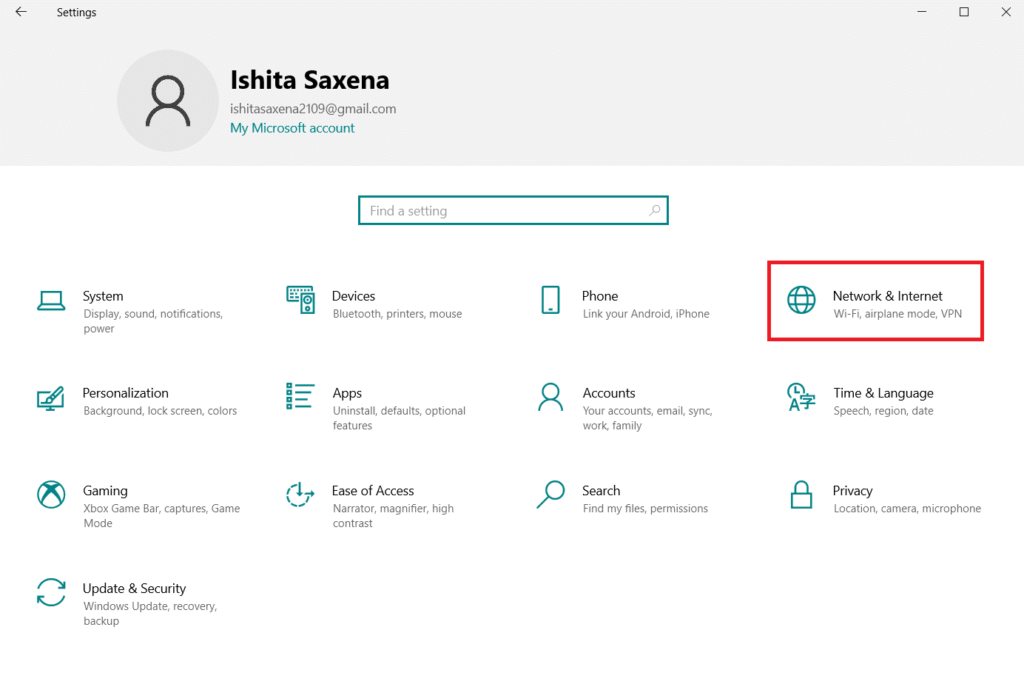
- Press the Windows key.
- Select the settings option from the drop-down list.
- Go to Network & Internet and disable airplane mode if enabled.
Note: We recommend reading these instructions on a second device before proceeding. Your primary Windows 10 PC should only be linked to the Internet if it loses its internet connection.
Method 1: Run the Internet Connection troubleshooter
Windows 10 can’t find the WiFi network solution: You can also use the troubleshooter to determine if your hardware is malfunctioning. You can run the troubleshooter by following the steps to fix a WiFi network not found on Windows 10.
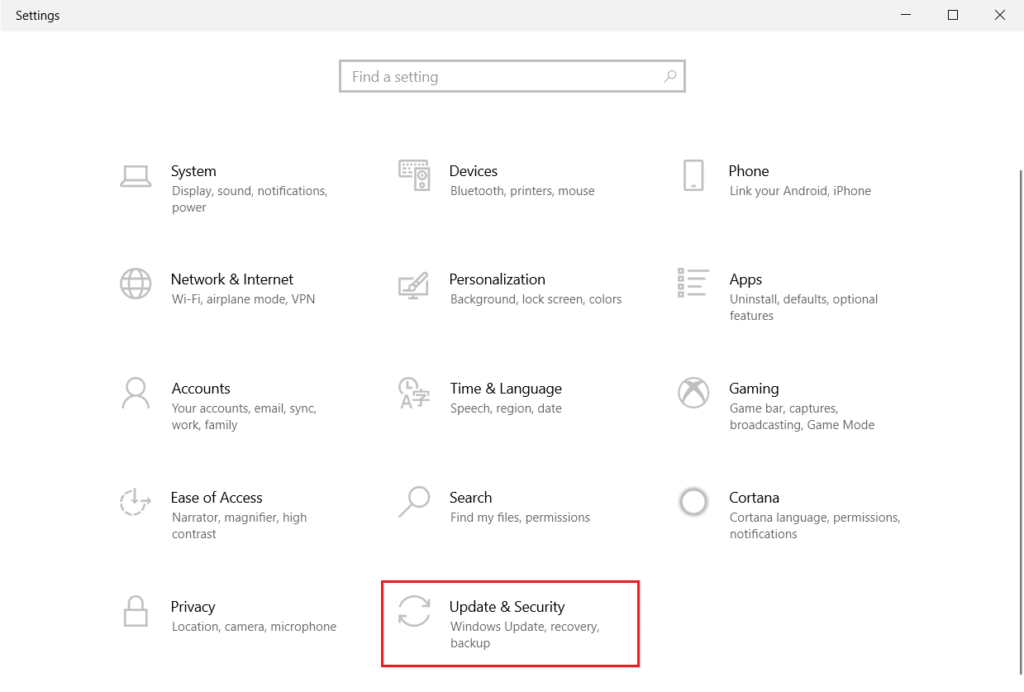
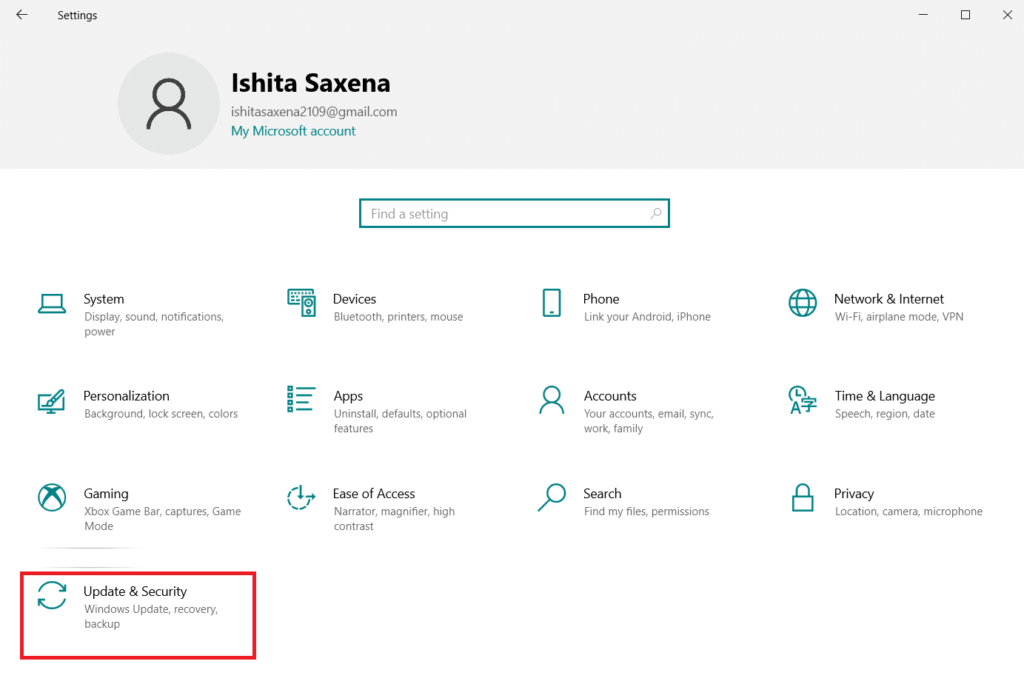
1. Press the Windows + I keys at the same time to launch the settings.
2. Click the Update & Security tile, as shown in the image.
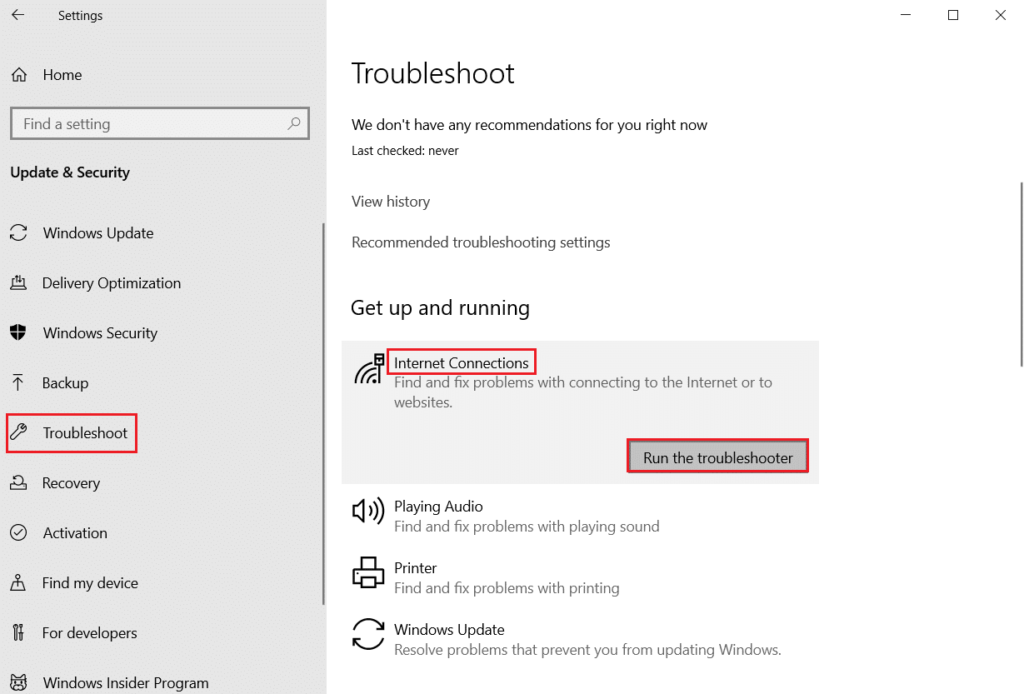
3. From the left pane, go to the Troubleshoot menu.
4. Select Internet Connections and click the Run Troubleshooter button as shown below.
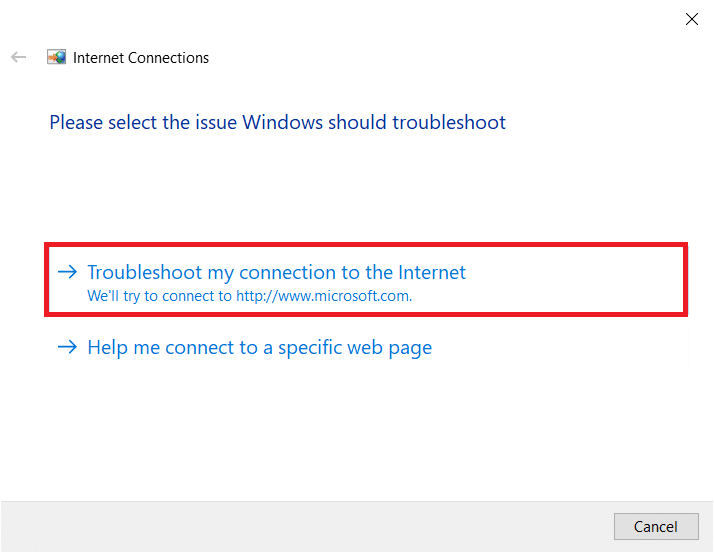
5. Select the Fix My Internet Connection Problem option.
6. Wait for the troubleshooter to find the problem.

7. Follow the on-screen instructions to troubleshoot. Once the process is complete, restart your PC.
Method 2: Run the network adapter troubleshooter
A network adapter troubleshooter, similar to the Internet connection troubleshooter, can also help. So, follow the steps below to fix WiFi network not found in Windows 10.
1. Open Settings and select Update & Security.
2. Go to the Troubleshoot menu from the left pane and find Find and fix other issues in the right pane.
3. Select the network adapter troubleshooter and click the highlighted Run troubleshooter button.

4. Select all network adapters and click Next.

5. If something goes wrong, click Apply this fix and follow the instructions given in the subsequent prompts.
Method 3: Update the driver
If you start having trouble finding your Wi-Fi network after installing Windows 10, it’s likely that your current driver isn’t compatible with Windows 10. Your laptop may also not be able to see accessible networks because of outdated network drivers. Follow these steps to install any available network adapter driver updates.
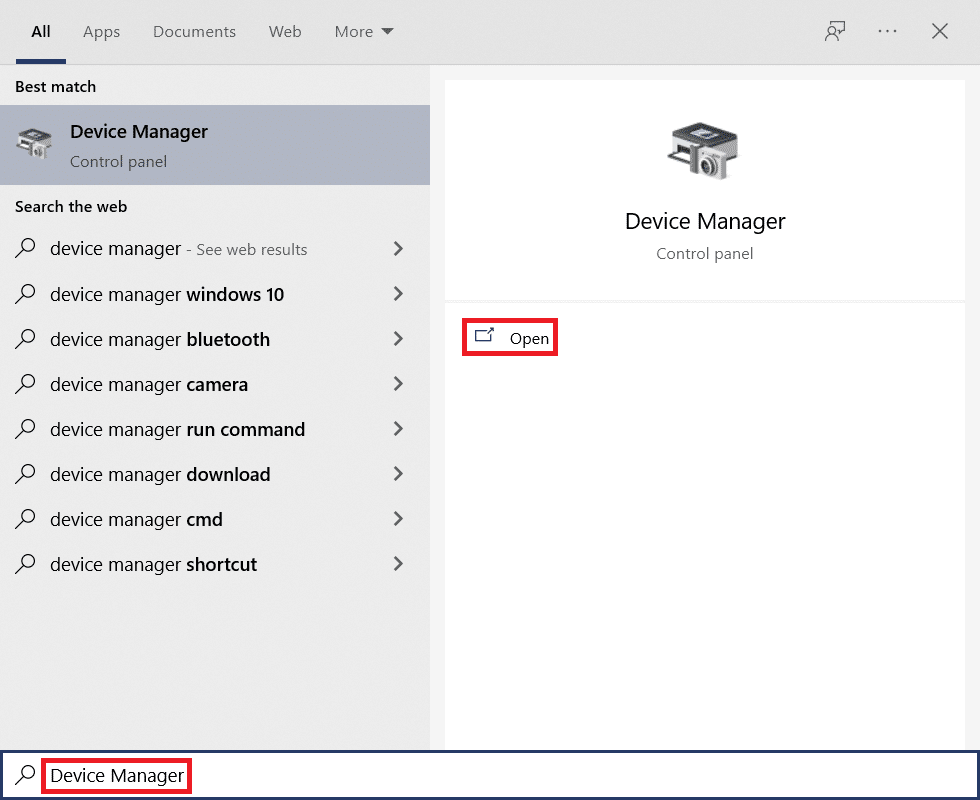
1. Press the Windows key, enter Device Manager and click Open.

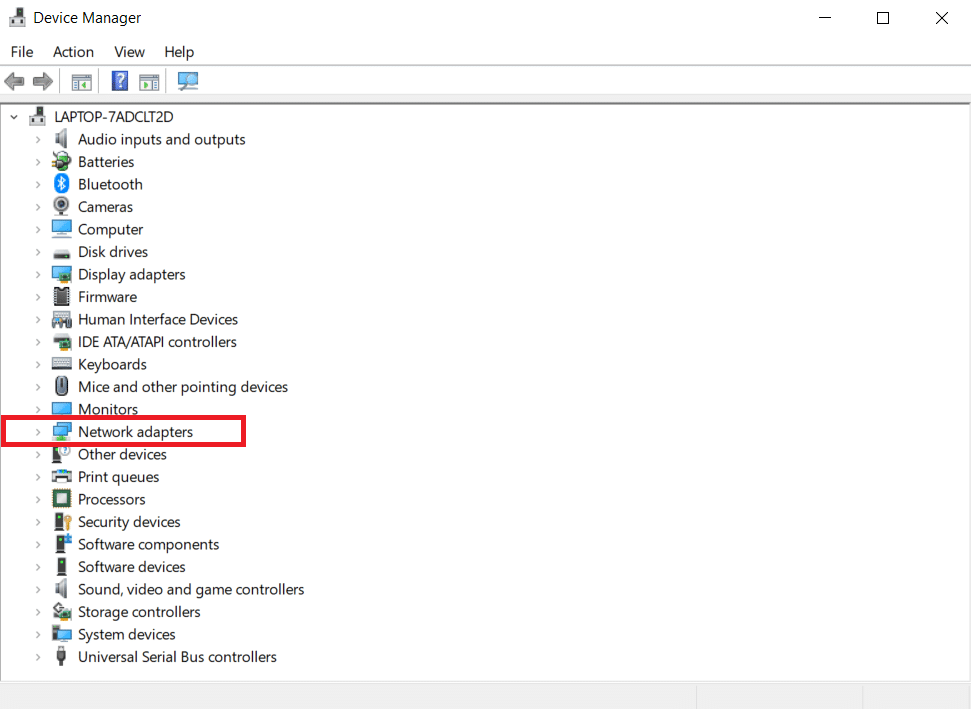
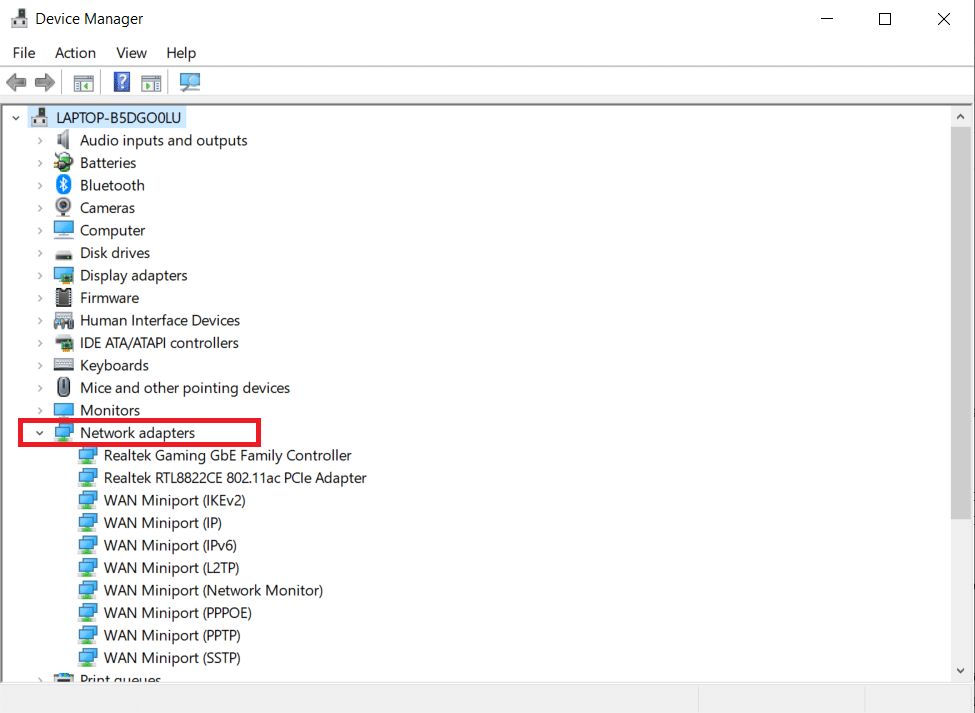
2. Double-click Network Adapters.
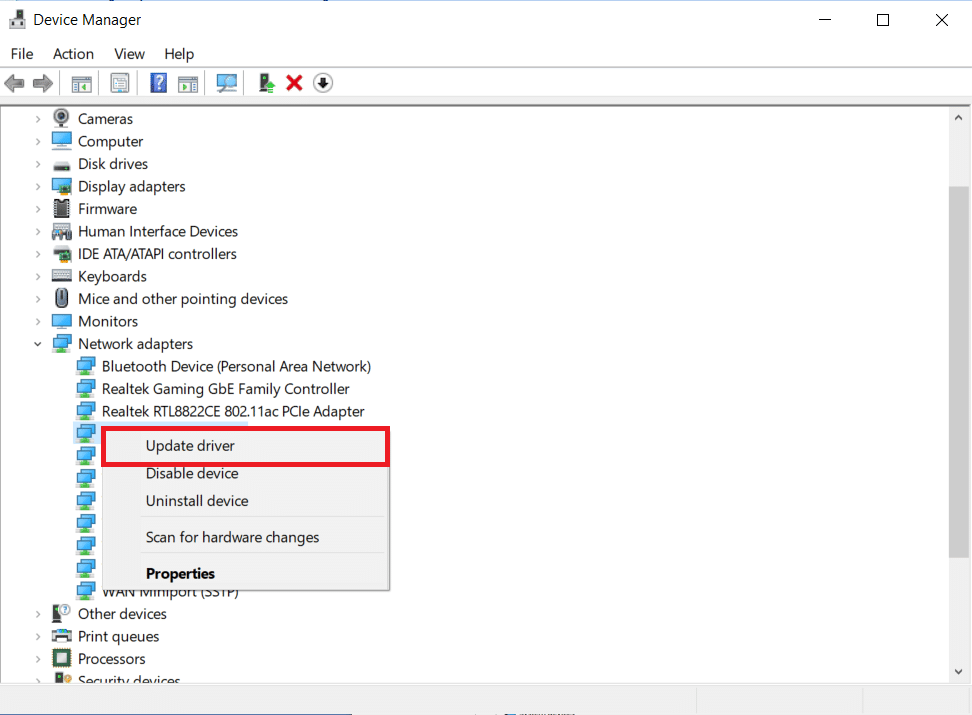
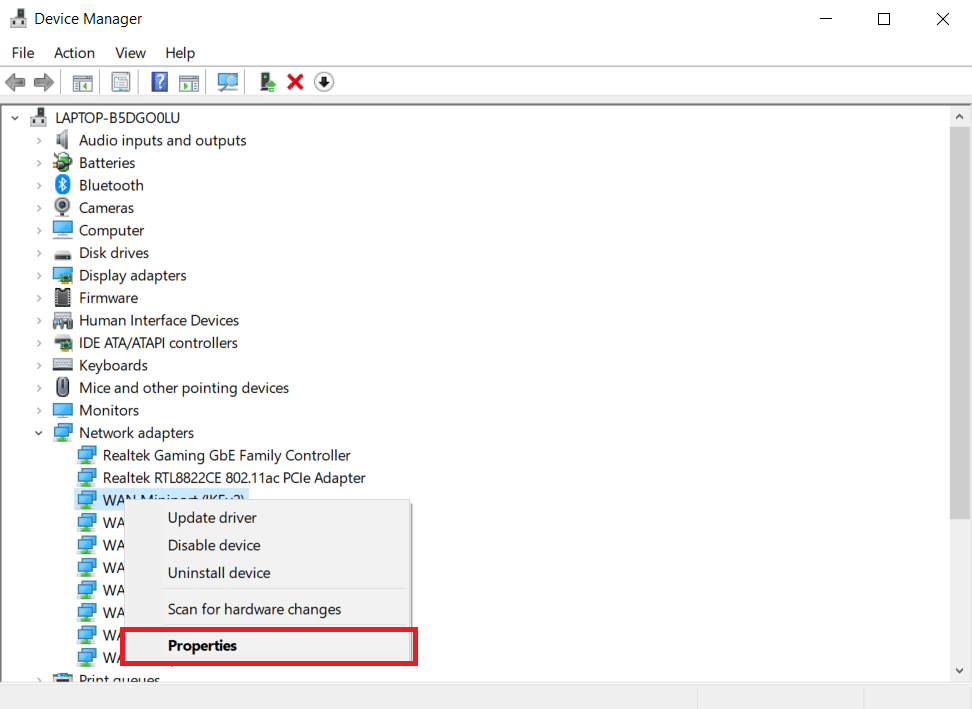
3. Right-click on your Wi-Fi device. Click Update Driver.
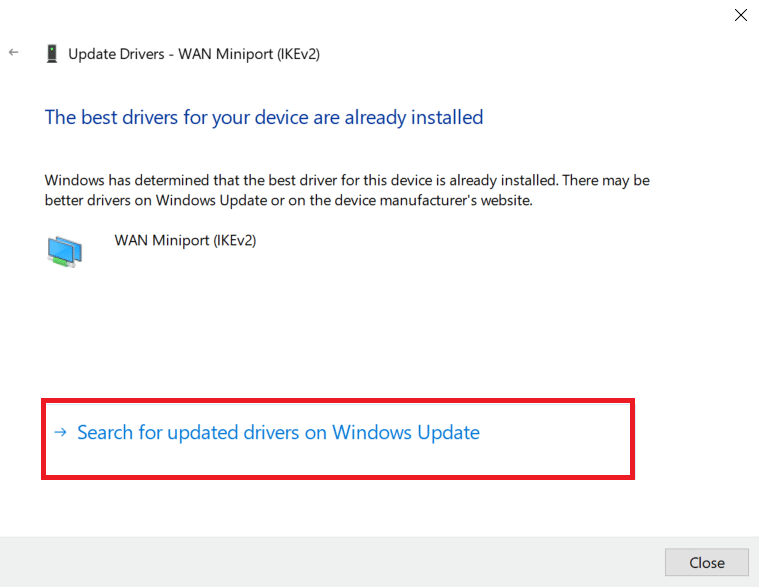
4. Select Search for drivers automatically.

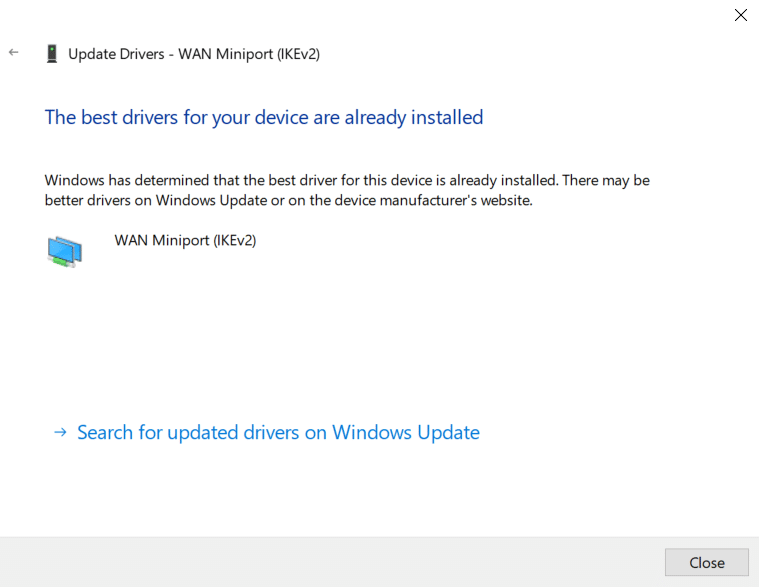
5A。 If a new driver is found, the system will install it automatically.
5B。 If the drivers are up to date, then it will show that the best drivers for your device are already installed.
6. Select Search for updated drivers on Windows Update to manually check for updates.
7. In the Windows Update screen, select View Optional Updates.
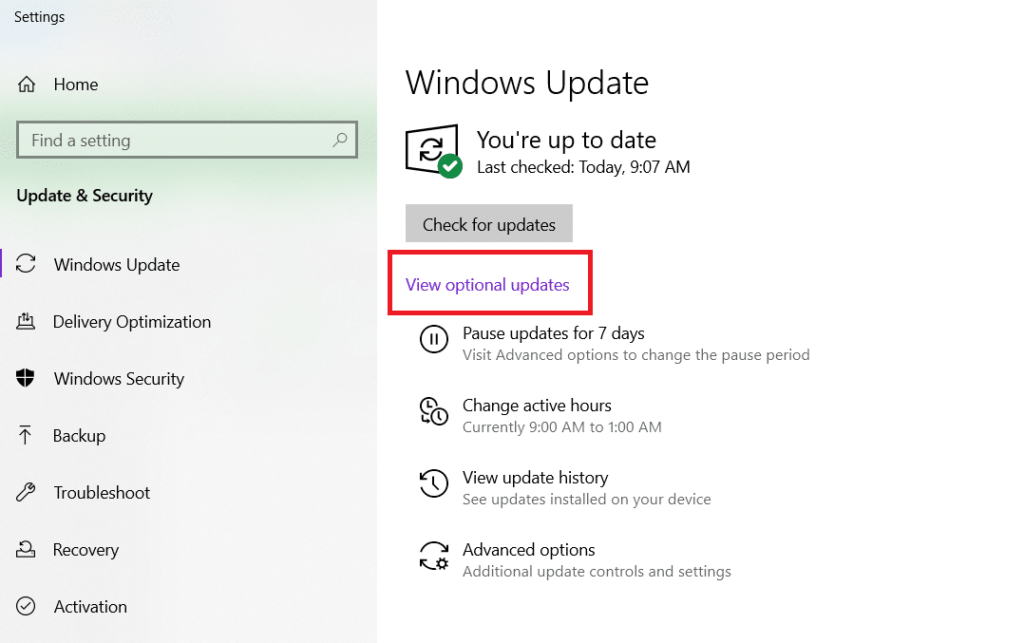
8. Select the driver you want to install by checking the box next to the driver and click the Download and Install button.

Method 4: Roll back the Wi-Fi adapter driver
Windows 10 WiFi Network Not Found Repair Tutorial: If the issue of Wi-Fi network not found starts to occur after a recent Windows update, or if your old drivers are in good working order before you update them, then you have to revert back to an older version of the driver in this case. To roll back your Wi-Fi driver, follow these steps:
1. Open Device Manager from the Windows Search menu.

2. Double-click in Device Manager to expand the area titled Network Adapters.
3. Right-click on your Wi-Fi card device and select Properties.
4. Go to the Drivers tab and select Rollback Driver.
Note: If the rollback driver option is grayed out, you can skip this method. If a previous version of the driver is not available, the option will be grayed out.

5. Allow rollbacks to occur. Restart your PC.
Method 5: Reinstall your current Wi-Fi adapter
How to Fix Windows 10 Not Finding WiFi Network? If rolling back the Wi-Fi driver doesn’t work, try reinstalling it and see if it fixes the issue with Windows 10 not finding the Wi-Fi network. This method will replace any defective or damaged drivers with the appropriate drivers.
1. Launch Device Manager from the Windows search menu.

2. Double-click in Device Manager to expand the area titled Network Adapters.

3. Right-click on your Wi-Fi card device and select Uninstall device.
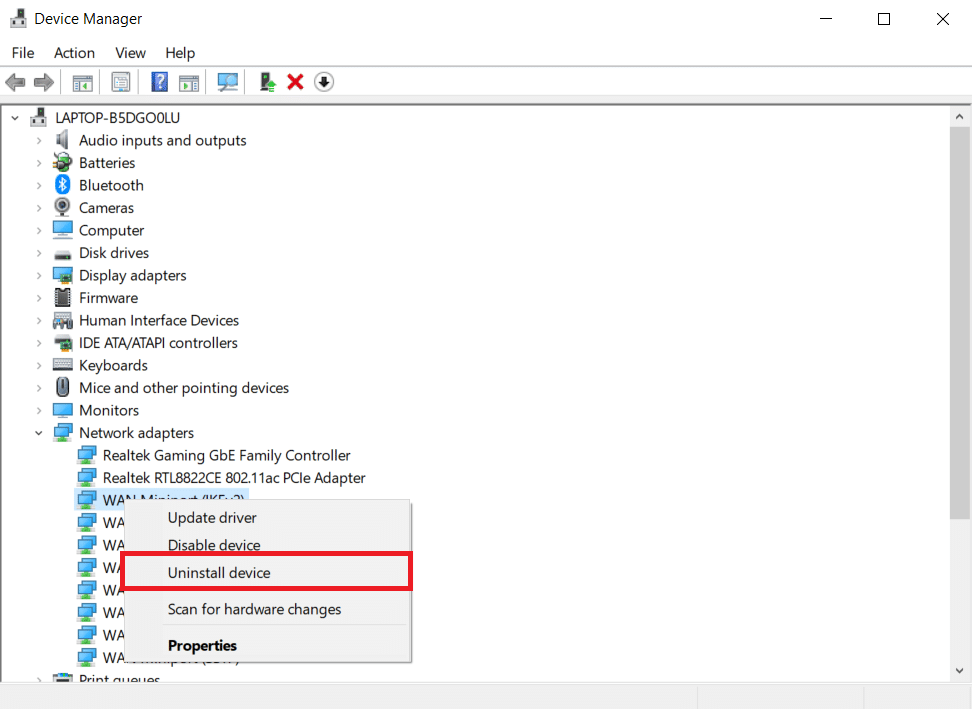
4. Select the Remove driver software for this device checkbox and click Uninstall.

5. Restart your computer after uninstalling the driver.
6. Visit the manufacturer’s website (e.g. Intel) to manually download the driver.

Method 6: Change adapter settings
Windows 10 can’t find a solution to the WiFi network: Otherwise, your computer won’t be able to connect to your network because the locale on your Wi-Fi adapter doesn’t match the locale on your Wi-Fi router. To change the region, do the following:
1. From the Windows search menu, go to Device Manager.
2. Double-click in Device Manager to expand the area titled Network Adapters.

3. Right-click on your Wi-Fi card device and select Properties.
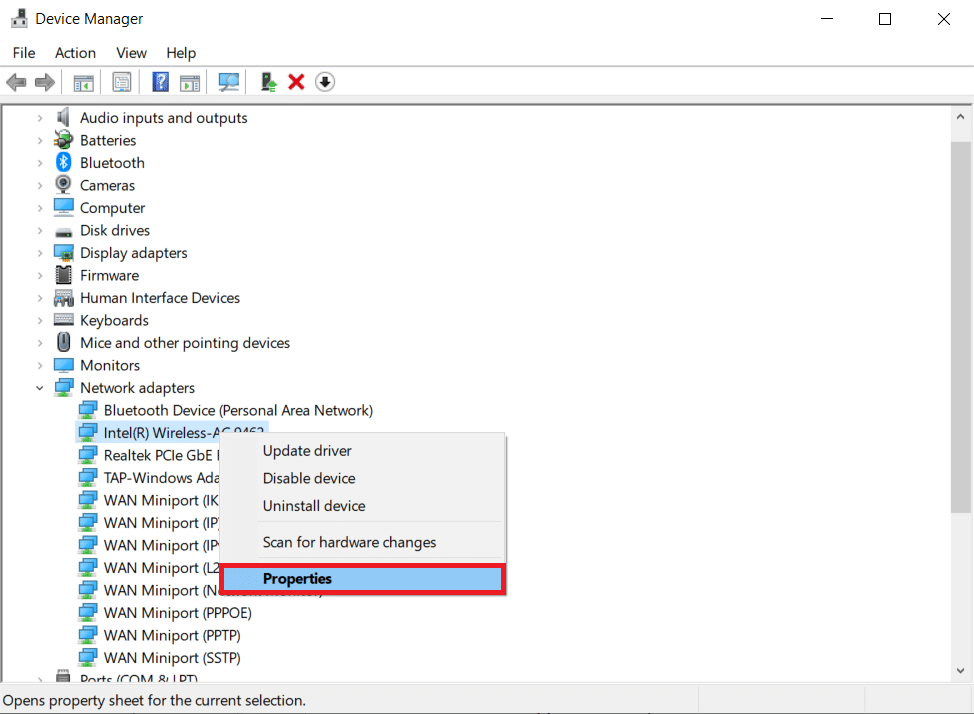
4. Select the channel width of 2.4 GHz in the property box.
5. Set the value to Auto.
Note 1: Some Wi-Fi routers may not be able to handle 5 GHz, so try a different combination.
Note 2: This feature is not available on all Wi-Fi adapters. For some, it’s in the Channels Number property or something like that.

6. Click OK.
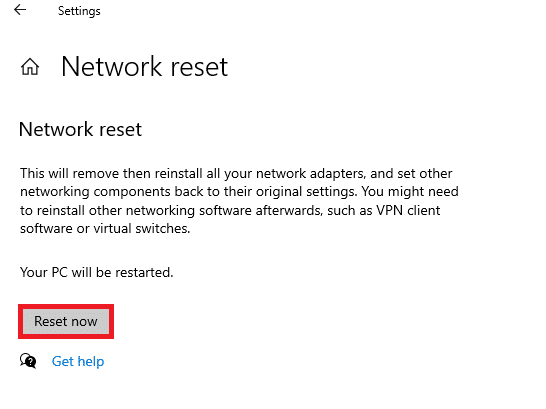
Method 7: Reset the network adapter
Your network adapter might be experiencing issues that a system restart doesn’t resolve. In this case, resetting it is a great option. Some people claim that resetting the Wi-Fi network adapter on their Windows 10 laptop helps them fix various Wi-Fi issues, such as not being able to find the Wi-Fi network.
1. Press the Windows + I keys to launch Windows Settings.
2. Navigate to the Network & Internet section of the Settings menu.

3. Click on the Network Reset option at the bottom.

4. Finally, click on “Reset Now” to confirm the prompt as shown in the image.
Method 8: Enable Hide SSID
As you can imagine, the network you want to join has a hidden SSID or name. You must first contact your system administrator to get the name and password to connect to it. Once you know both, you can connect to it.
1. Navigate to Windows Settings.
2. Navigate to Network & Internet Settings.
3. Navigate to the Wi-Fi tab. Select Manage Known Networks.

4. Select Add New Network.

5. Enter the network name, security type, and password in the pop-up box that appears. Click Save.

Method 9: Disable faulty VPN
If used incorrectly, a VPN, whether it’s a VPN connection you manually set up on Windows, or a commercial VPN service that automatically configures network settings, can affect your Wi-Fi connection.
- Turn off any VPN services you’re using, restart your computer, and look for the network.
- Connect to one of the networks once it appears and re-enable the VPN service.
- If your connection disappears or stops working after you enable the VPN, check to see if your ISP or your country is blocking the service you’re using.
- Try using a different VPN service or a service that restricts your browser or a single program instead of the full system network activity. After the troubleshooting is complete, check whether the problem of Windows 10 no Wi-Fi network persists.
Method 10: Run a malware scan
Some malware agents are smart enough to infiltrate your computer and prevent you from connecting to the Internet. To find and remove any errors, the best plan of action is to perform a comprehensive system scan. Follow the steps below.
1. Press and hold the Windows + I keys at the same time to open Windows Settings.
2. Now, select Update & Security Link as shown in the image.

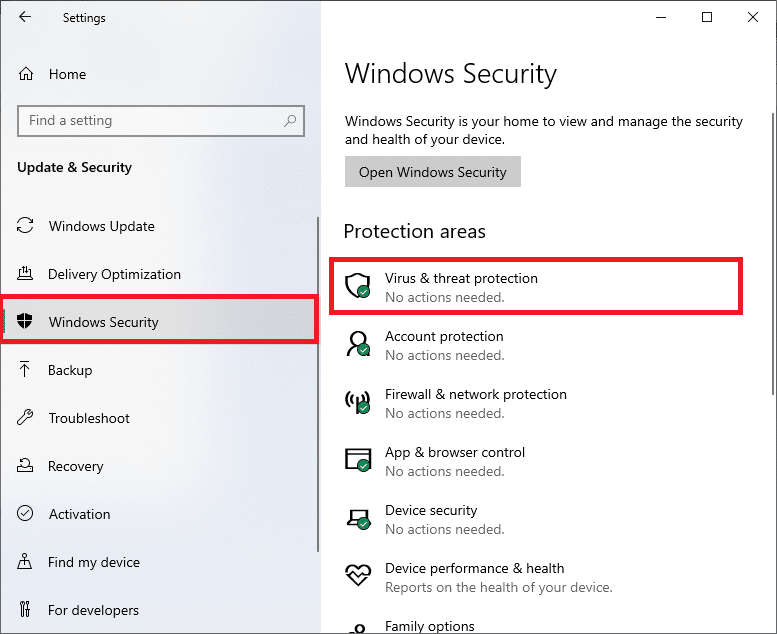
3. Then, navigate to Windows Security in the left pane.
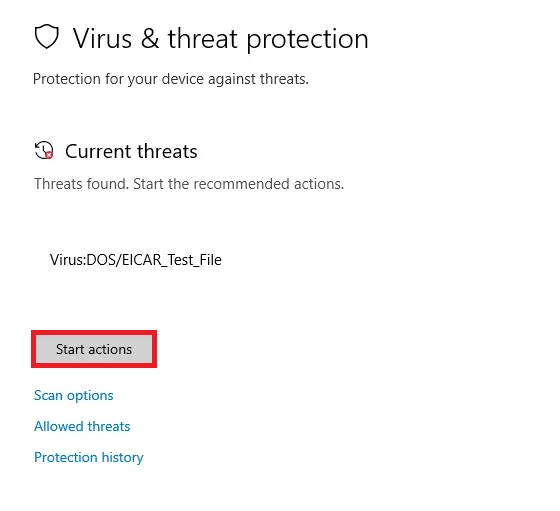
4. Now, click on Virus and Threat Protection under the Protection area as shown in the image.
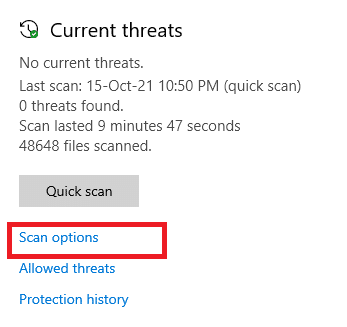
5. Then, click on the Scan option as shown in the image.
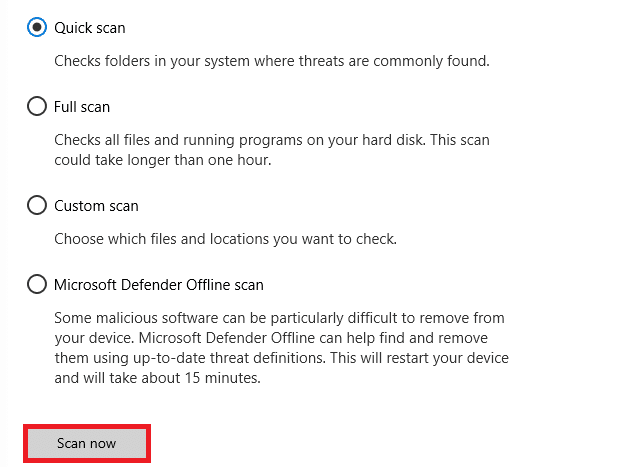
6. You can select a quick scan, full scan, custom scan, or Microsoft Defender offline scan based on your needs, and then click the highlighted Scan Now.
7A。 If there are any threats, click Start Action under the current threat.
7B。 If your computer doesn’t have any threats, a No Current Threat prompt will pop up, as shown below.

Method 11: Temporarily disable antivirus software (not recommended).
How to Fix Windows 10 Not Finding WiFi Network? To protect you from attacks, the firewall may not allow any internet connection if it has strict regulations. This could also be the reason why your Windows 10 PC can’t detect any Wi-Fi networks. For now, here’s how to turn it off to fix WiFi network not found in Windows 10.
Note: Avast Antivirus is used as an example. The steps and procedures may vary depending on the antivirus software.
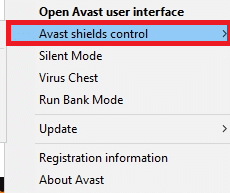
1. Navigate to the antivirus icon in the taskbar and right-click on it.

2. Now, select the Avast shields control option.
3. Select the option as per your convenience and confirm the prompts displayed on the screen.
- Disable for 10 minutes
- Disable for 1 hour
- Disable until the computer restarts
- Permanently disabled

Note: Now, go back to the main window. Here, you’ve turned off all blocks from Avast. To activate the settings, click TURN ON.

Method 12: Modify the service configuration
Workaround for Windows 10 Can’t Find WiFi Network: Make sure the service settings are configured correctly to resolve the issue of not finding WiFi network on Windows 10. Follow the steps below.
1. Press the Windows + R keys at the same time to launch the Run dialog box.
2. Type services.msc and press Enter.

3. Scroll down and double-click Network Location Awareness.

4. Set the startup type to Automatic. Click Apply, and then click OK.

5. Similarly, set the startup type for the following services.
- Web Listing Service – Manual
- Windows Event Log – Automatic
- Windows Update Manual
- WLAN AutoConfig – Automatic
- Radio Management Services – Manual
5. Close the service window after making changes to all of the above services.
Method 13: Turn on Network Discovery
Windows 10 Can’t Find WiFi Network Repair Tutorial: Sometimes, the network discovery option turns off, causing this issue. Turn on Network Discovery by following these steps to fix WiFi network not found in Windows 10.
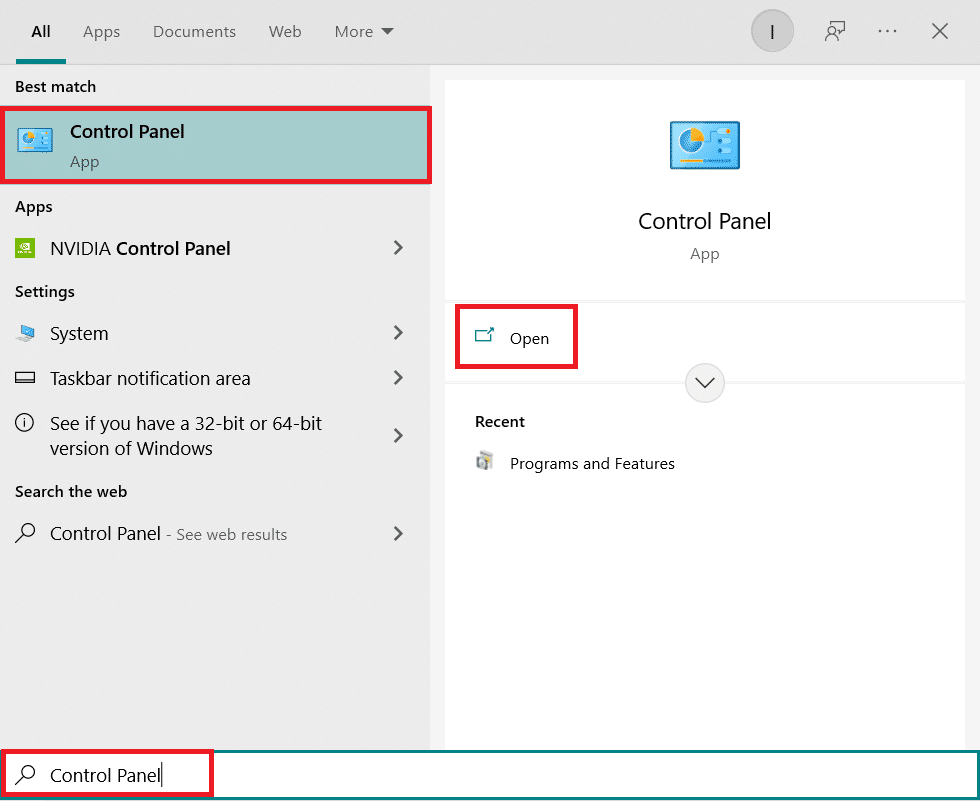
1. Press the Windows key. Type in the Control Panel and open it.
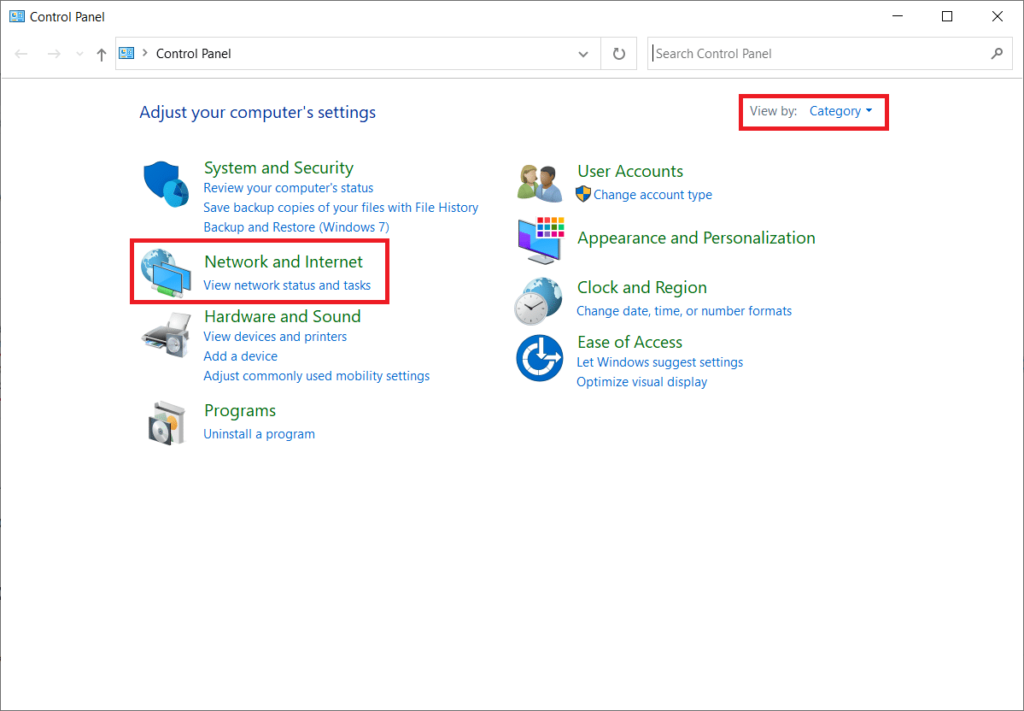
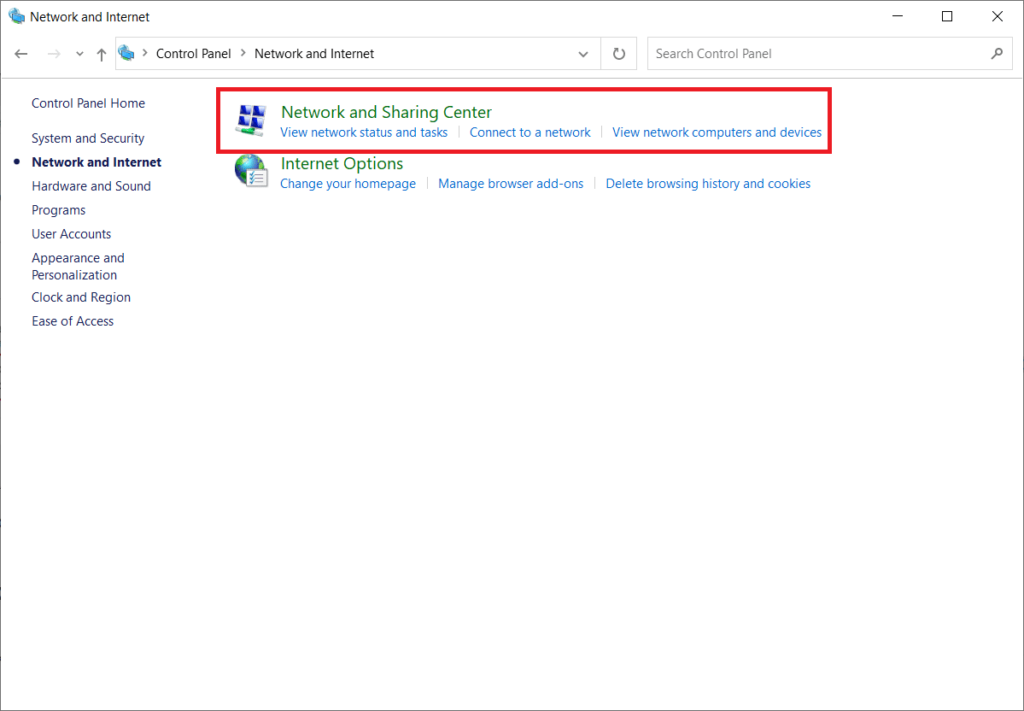
2. Set the viewing method to a category. Select Network & Internet.
3. Select Network & Sharing Center.
4. Click Change advanced sharing settings.
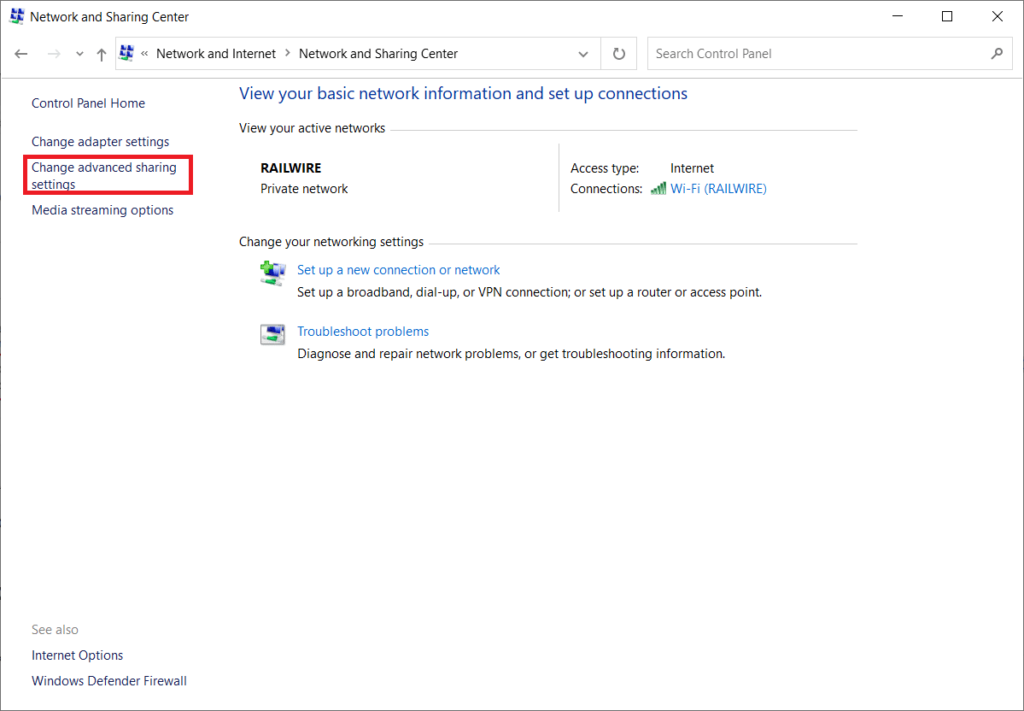
5. Select the option to open Network Discovery and click Save Changes.
Note: To make this change, you should have admin privileges.

Method 14: Contact your network administrator
Network access to control the system is possible. This is done by blocking its MAC address in the router. It’s also conceivable that only specific MAC addresses can join the network. This is often the case with business networks, such as those used at work. Contact your network administrator and request that your system be added to the list of allowed systems. If you’re having trouble connecting to your home network, connect to your router with a LAN cable and manually enter your system MAC address. Depending on the router you have, the procedure will be different.
We hope you found this information helpful and that you can address how to fix Wi-Fi network not found in Windows 10. Please tell us which method works best for you. If you have any questions or comments, please leave them in the comments section below. Let us know what you’d like to know next.