Microsoft has just released a new Windows Insider build with tons of new features, including an app folder in the Start menu, new touch gestures, and more. One useful element that goes unnoticed in the new additions is live captions. That’s right, you read that right. Live captions are a popular feature on Android smartphones and are now accessible in Windows 11.
The feature is only available offline on Windows 11 Insider build 22557, and voice data is processed locally on your computer, without the need to use the cloud. It is expected that the feature will enter a stable release at some point in the future. With that in mind, here’s how to use and set up live captions on Windows 11.
Windows 11 How-To Enable Live Captions Tutorial: What Are Live Captions in Windows 11?
“Live captions will help everyone, including those who are deaf or hard of hearing, better understand audio by viewing captions for voice content,” Microsoft said in a post. ”
Live captions are an accessibility feature that converts audio that you play on your PC to text. If you don’t have an active internet connection, the feature will run and audio data processing will be done on your Windows 11 PC. Live captions are currently only available in English (US), but more languages are planned to be added soon.
How Windows 11 enables live captions
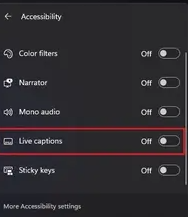
Step 1: Switch to the Accessibility tab from the left sidebar of the Settings app. Select “Subtitles” from the “Listening” bar.

Step 2: To get live captions on your PC, turn on the new “Live Captions” toggle. You can also use the Win+Ctrl+L keyboard shortcut in Windows 11 to enable live captions.

Step 3: To confirm the local processing of your voice data, click “I agree” from the pop-up window at the top of the screen. According to Microsoft, your data is not shared with the cloud.
Steps on how to customize live captions for Windows 11?
Windows 11 Tutorial on how to enable Live Captions: You can now adjust some parts of the interface, such as subtitle box position, profanity filtering, microphone audio, and subtitle style, after setting up Live Captions. Here’s how you can change them:
Step 1: Select “Location” from the “Settings” icon in the top right corner of the subtitle box. You can now choose to have the caption frame appear at the top, bottom, or anywhere on the screen.
Step 2: You can also filter out profanity and incorporate audio from your microphone into subtitles. To adjust these settings, click the Settings icon again and select Subtitle Selection.
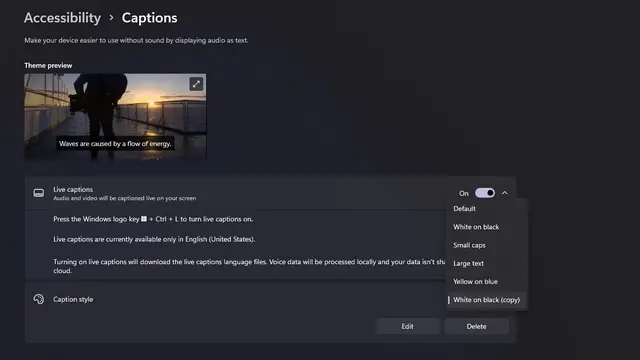
After that, we can adjust the subtitle style. White on black, lowercase, uppercase, and yellow on blue are all options. The text, background, and subtitle windows can all be customized based on color and opacity. In the theme preview window, you can see what the title style looks like.
How do I add a shortcut to the quick settings for live captions on Windows 11?
How do I enable live captions on Windows 11? After you set up Live Captions, you can use the Windows Quick Settings tile to enable or disable the feature. Here’s how to use Quick Settings to get live captions:
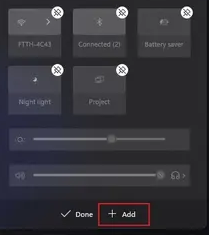
Step 1: To use Live Captions, you’ll need to quickly set up the tile by pressing the Accessibility Window key + A. Click the pencil icon to add it to the Quick Settings tray if it doesn’t already appear.

Step 2: To get a list of available tiles, click “Add”.
Step 3: From the list of possible tiles, select Accessibility. If you find them useful to you, you can even choose to add more tiles.

Step 4: After selecting the tile, click “Done” to save your modifications.
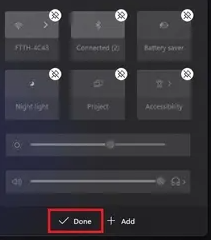
Step 5: Now, select the accessibility tile you just created.

Step 6: To activate the feature, enable the “Live Captions” toggle from the list of options that appears. Later, you can use the same technique to disable live captions.
A final word on what are live captions and how to enable them on Windows 11?
On Windows 11, the live captioning feature works very well. Aside from the occasional hiccups that most speech-to-text systems encounter, the feature seems to be reliable enough to be used on a daily basis.