Acer laptops are one of the most popular options for laptops because it has more features and a reasonable price range. If your Acer laptop isn’t connected to WiFi, don’t panic, you’re not alone. There are many users who have recently reported the same issue with their Acer laptops. And, it’s very frustrating, especially when you’re about to play your favorite game or watch a movie online. However, don’t worry, the problem can be solved easily and quickly. This article walks you through best practices for solving problems.
100% working fix for Acer laptop won’t connect to WiFi
These workarounds will surely help you fix the Acer laptop won’t connect to WiFi issue. Without further ado, let’s read them!
Fix 1: Check if the Wi-Fi AutoConfig service is running
How to Fix Acer Laptop Won’t Connect to WiFi? The WLAN AutoConfig service provides the logic needed to discover, configure, connect, and disconnect WLANs (wireless local area networks). If this service isn’t running, you might not be able to connect to a WiFi network. Therefore, you should make sure that the Wi-Fi AutoConfig service is enabled. If not, follow the steps outlined below:
- Press the Windows + R keys to invoke the Run Dialog utility.
- Enter services.msc in the Run box and click OK.

3. In the Services window, scroll down until you find WLAN AutoConfig and double-click it.

4. Make sure that the startup type is set to Automatic and that the service status is Running.
5. Click Apply and OK to save the most recent changes.
Once done, restart your Acer laptop and check if the Acer laptop not connecting to WiFi has been fixed. Try the next solution to fix the problem.
Fix 2: Update your WiFi drivers
Solutions for PC Won’t Connect to WiFi: If you’re using an outdated, lost, or damaged wireless network adapter driver, your Acer laptop won’t connect to WiFi. If this is the case, then you should make sure to update your wireless network adapter drivers from time to time.
In any case, you can get the WiFi driver from the official website of the wireless network adapter manufacturer. However, it can be a time-consuming and error-prone task, especially for newbies. Therefore, we recommend using Bit Driver Updater.
Bit Driver Updater is one of the best third-party solutions to easily update system drivers. In addition to updating drivers, the utility is also a great way to improve your PC’s performance. The utility automatically detects the Windows operating system version and finds out its genuine drivers. To use this tool, you need to follow these steps:
- Download and install the Bit Driver Updater.
- Run the utility on your computer and click the Scan button in the left pane.

3. This will take a few seconds. Wait until you see the scan results on your screen.
4. Then, click the Update Now button next to the wireless network adapter driver. If you want to update other outdated drivers, as well as Wi-Fi drivers, you’ll need to click the Update all button instead of Update now. This way, you can update all outdated drivers with a single click.

However, to use the one-click driver update feature, you need to rely on the advanced version of Bit Driver Updater. The premium version comes with a 60-day full money-back guarantee and 24/7 technical support.
After installing the latest WiFi drivers, try connecting your laptop to WiFi. Hopefully this issue should be fixed, if not, then move on to other solutions.
Fix 3: Change the power management settings
How to Fix Acer Laptop Won’t Connect to WiFi? Acer can’t connect to WiFi? Then, consider modifying the power management settings for your WiFi connection. This works for many Acer users, so it would be better to at least give it a try. Follow these steps:
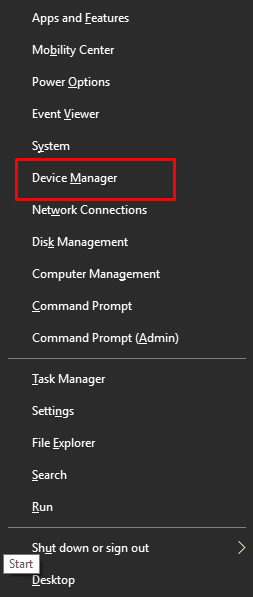
- On your keyboard, press the Windows + X keys and select Device Manager from the available options.
2. In the Device Manager window, find the network adapter and double-click it.
3. Find your wireless network adapter and right-click on it to continue.
4. Select Properties.
5. Head to the “Power Management” tab and unmark the box that appears next to “Allow the computer to turn off this device to save power.” Then, click OK to save the recent changes.
Once done, try restarting your laptop. After that, try connecting your Acer laptop to WiFi to test the issue. If your Acer laptop is not connecting to WiFi, check the last resort.
Fix 4: Connect to WiFi manually
Solutions for PC Won’t Connect to WiFi: The above suggestions don’t work? Don’t worry, this might help! You can consider manually connecting to a WiFi connection on your respective laptops. Here’s how to do it in a few simple steps:
- Press Windows + R to launch the Run dialog box, and then type control in the Run box. Then, click the OK button.
- This will take you to the Control Panel window. Here, you can set the viewing method to a large or small icon. Then, click Network and Sharing Center.
- Next, click on the Set New Connection or Network option.
- In the next prompt, select Connect to the wireless network manually and click Next to continue.
- Enter the necessary information, such as the network name, security type, and security key. After that, make sure to tick the box next to Automatically start this connection and click Next.
- Finally, follow the on-screen instructions to complete the process.
Now, try connecting your Acer laptop to your wireless network. This will definitely solve the problem.
Acer laptop not connecting to WiFi: Fixed
So, that’s all there is to how you can enjoy a trouble-free internet connection on your Acer laptop. We hope these 5 solutions will be helpful to you to fix the problem of Acer laptop not connecting to WiFi. If you have any further suggestions, let us know in the comments below. Feel free to share your doubts or queries in the comments.