Introduce
How Do I Configure Nginx Reverse Proxy in Kibana? The easiest way to protect your Kibana dashboard from malicious intruders is to set up an Nginx reverse proxy. By doing so, you can ensure that only password-protected, authorized users can access Kibana (and the data in Elasticsearch).
How Do I Configure Nginx Reverse Proxy for Kibana? In this tutorial, you’ll learn how to configure Nginx Reverse Proxy for Kibana, including related Kibana examples of configuring Nginx Reverse Proxy.
Note: If you haven’t set up the ELK stack yet, please refer to our guide: Installing the ELK Stack on CentOS or Installing the ELK Stack on Ubuntu.
Configure the Nginx reverse proxy for Kibana
Step 1: Configure Kibana
How Do I Configure Nginx Reverse Proxy in Kibana? Before you start setting up Nginx, make sure to edit the configuration files for Kibana and Elasticsearch.
1. First, run the following command to open the Kibana configuration file:
sudo vim /etc/kibana/kibana.ymlIf you follow the steps listed in your Kibana installation, the file should look similar to the one shown below.
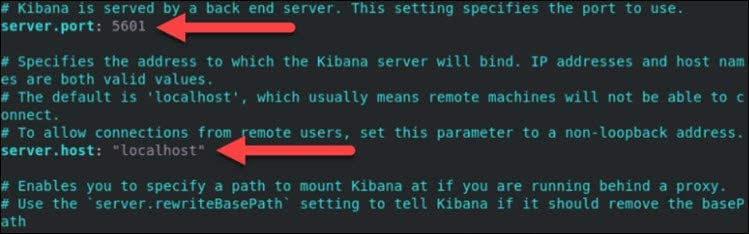
2. Kibana Configuration Nginx Reverse Proxy Example – Change the default server port and server host address to the following values:
server.host:"localhost"server.port:56013. Next, save and exit the file.
4. Restart the Kibana service with the following command:
sudo service kibana restartStep 2: Configure Elasticsearch
1. How do I configure Nginx reverse proxy for Kibana? Repeat the same process for Elasticsearch. Open its configuration file:
sudo vim /etc/elasticsearch/elasticsearch.yml2. Next, find the following lines and change the default port and host:
http.port: 9200network.host: localhost3. Save the file and restart the service:
sudo service elasticsearch restart4. Finally, verify that you have access to Kibana by navigating to the following URL in your browser:
http://localhost:5601
Step 3: Install and configure Nginx
How Do I Configure Nginx Reverse Proxy in Kibana? The next step is to set up Nginx.
1. If you don’t have Nginx installed, run the command:
sudo apt-get install nginxNote: For detailed instructions on Nginx installation, you can refer to How to Install Nginx on Ubuntu 18.04 or How to Install Nginx on CentOS 8.
2. Kibana Configuration Nginx Reverse Proxy Example – After setting up Nginx, install apache2-utils, a utility for creating password-protected accounts:
sudo apt-get install apache2-utils3. Then, create a user account that you want to use to access Kibana. user_account replace it with the username you want to use in the command:
sudo htpasswd -c /etc/nginx/htpasswd.users user_account
4. The output then asks you to provide and retype the password for this user:
New password:
Re-type new password:
Adding password for user user_account
5. Next, create a configuration file for Nginx:
sudo vim /etc/nginx/conf.d/kibana.conf6. Add the following to your text editor:
worker_processes  1;
events {
  worker_connections 1024;
}

http {
  upstream elasticsearch {
    server 127.0.0.1:9200;
    keepalive 15;
  }

  upstream kibana {
    server 127.0.0.1:5601;
    keepalive 15;
  }

  server {
    listen 8881;

    location / {
      auth_basic "Restricted Access";
      auth_basic_user_file /etc/nginx/htpasswd.users;


      proxy_pass http://elasticsearch;
      proxy_redirect off;
      proxy_buffering off;

      proxy_http_version 1.1;
      proxy_set_header Connection "Keep-Alive";
      proxy_set_header Proxy-Connection "Keep-Alive";
    }

  }

  server {
    listen 8882;

    location / {
      auth_basic "Restricted Access";
      auth_basic_user_file /etc/nginx/htpasswd.users;

      proxy_pass http://kibana;
      proxy_redirect off;
      proxy_buffering off;

      proxy_http_version 1.1;
      proxy_set_header Connection "Keep-Alive";
      proxy_set_header Proxy-Connection "Keep-Alive";
    }
  }
}
7. Save and exit the file.
Note: In the above configuration, Nginx connects to Kibana via listening on port 8882 and Elasticsearch via port 8881. If you’re using a different port, make sure to change the configuration accordingly.
Step 4: Restart the service
You’ll need to restart the service to recognize the new configuration.
1. Run the following command to restart Nginx:
sudo service nginx restart2. Then, restart the Kibana service with the following command:
sudo service kibana restartStep 5: Confirm that authentication is working
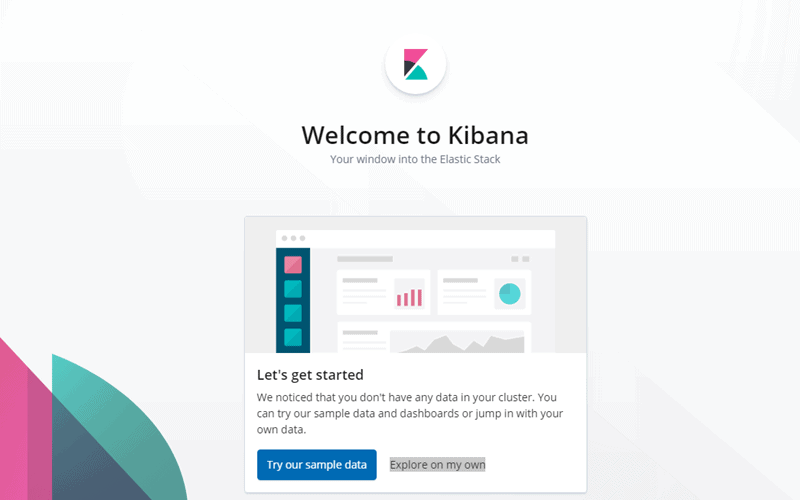
1. Kibana Configuration Nginx Reverse Proxy Example – Open a web browser and navigate to the IP address you assigned to Kibana.
2. A verification window appears asking you to provide your username and password.

3. How do I configure Nginx reverse proxy for Kibana? Enter the credentials that were configured when setting up Nginx and select Sign In. If you provide the correct information, the browser will open the Kibana welcome page.
Conclusion
How Do I Configure Nginx Reverse Proxy in Kibana? If you follow this guide, you should have successfully configured the Nginx reverse proxy for Kibana. This provides an extra layer of security to protect data managed through Kibana.
Your next step should be to explore Kibana features for visualization in our Kibana tutorial.