Rusty bolts and studs break when disassembled, which is the worst nightmare of any mechanic and anyone else trying to fix a machine. Luckily, if you’re a handyman who likes to maintain your vehicle in your own garage, there are now many options on how to remove broken bolts that weren’t available 20 or 30 years ago.
Auto Bolt Repair Tutorial: When your screw head is peeled or broken or the bolt head is spalled or broken, it is impossible to remove it without the right tools and the right method. If the bolts in your car are broken, don’t worry, the following maintenance tips will help you remove the metal pieces easily.
How to remove a broken car bolt: the tools you need
What is the best tool or the best way to remove a damaged bolt depends on several factors. Sometimes a hammer or drill can do the job. Other times, you may also be lucky and have enough space to weld the bolt or nut to the end of the damaged bolt or stud. Sometimes you may need more.
Depending on the state of the bolt, there are different tools and methods to remove the damaged bolt.
Sometimes stud bolts and bolts break where you can’t reach the hammer or drill bit, usually as is the case with exhaust manifold bolts. In these cases, we expect the extractor or a pair of locking pliers to work, but you will most likely need to remove the parts from the vehicle.
If you can’t insert pliers, pullers, drills, or hammers into where the stud or bolt breaks, another option is to grind the two opposing sides flat so you can grab them with a wrench.
Tools Needed:
- Hammer
- Drill bits and drill bits
- Screw extractor kit
- T-handle or locking pliers
- wrench
- magnet
- Center punch
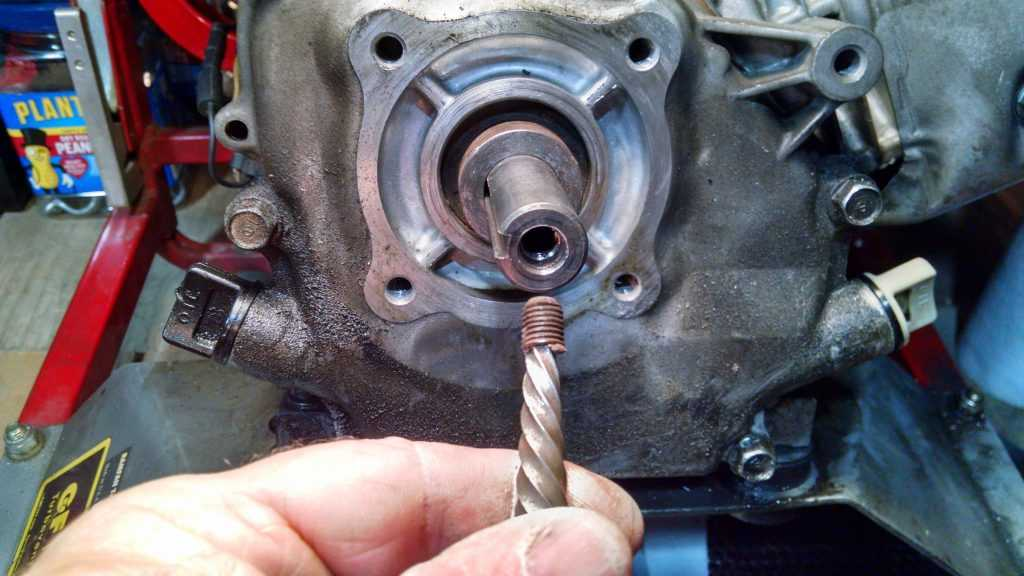
Screw extractor
Screw extractors are available in a variety of sizes and are suitable for screws ranging in diameter from 3/32″ to over 1/2 inch.
A screw extractor is a high-strength steel shaft with a square head on one end and an inverted tapered cutting thread on the other. The square head is suitable for turning the T-handle of the extractor. You can also use the locking pliers to clamp and turn the head.
The tapered thread is located at the other end of the tool. These are designed to be used to screw screws or bolts backwards or counterclockwise after the pilot hole has been drilled for the first time. The ends are tapered so that when the extractor is rotated, the extractor can drill deeper and tighter into the damaged screw. So when you rotate the extractor counterclockwise, it gets more and more drilled into the damaged screws, and the damaged ones are exiting.
If the stud or bolt is broken and its diameter protrudes large enough for the tool to grab it, you can use a cam extractor to get the job done. Bolt and Stud Extraction has evolved from cam-style extraction to multi-piece K it with tools for each bolt size over the years. Essentially, both work by using the gripping force generated by the counterclockwise torque on the tool to grip the damaged part with enough force and remove it as much as possible around its diameter.

A multi-piece extractor kit for removing damaged bolts.
The method of using the cam extractor is to turn the extractor to open the jaws so that it is sufficient to access the damaged stud before manually tightening it. Then use a wrench or ratchet and socket to apply enough torque in the hope of removing the problem part without destroying the head or the inside of the block. Remember to use ample penetrating oil in the process.
If the bolt you’re dealing with breaks too close to grip, use a grooved extractor. This is the longest-used method.
T-handle
Auto Bolt Repair Tutorial: T-Handle gets its name from its shape. The handle is mounted on the end of the extractor bit and can usually be tightened with a knurled nut that works like a drill chuck.
The T-handle fits extractors of all sizes. If you don’t have a T-handle, you can use locking pliers to turn the screw extractor.
How to remove a damaged bolt with a puller
How do I remove a broken car bolt? Here are the steps to the best way to remove the damaged bolt using an extractor.
1. Tagging
First, using a hammer, mark the center of the broken bolt with a center punch. Hit it straight with a hammer to create the starting point of the drill.
Equally important, it also reduces the chance of damaging the bolt threads when you pull out the bolt. If the threads on the bolt or bolt hole are damaged, the bolt may not be removed. In addition, if the threads on the bolt holes are damaged, the new bolt may not be available after the old bolt is pulled out.
Drill a pilot hole
Activate the reverse setting on the drilling machine. The left-handed drill will be threaded in the opposite direction. Drill with your left hand because it will twist in the same opposite direction as the broken bolt, which will prevent the bolt from being tightened tighter. The left hand drill will grasp and unscrew the tight bolt, and you can use a pair of handles to grab it and then remove it.
However, we recommend that you use a removal kit that is appropriate for the size of the bolt you want to remove. Use a drill that corresponds to the size of the extractor you will be using to drill the damaged stud to the specified depth.

How to use a drill and puller to remove damaged bolts.
Keep the following tips in mind when drilling:
- When drilling, let the drill bit do the work, don’t force it. Also, use a bit speed that is appropriate for the drill bit you choose.
- Since you’re drilling in metal, you should keep a slow and steady drilling speed. Drilling too fast can cause the drill bit to overheat and dull quickly. Using lubricants or cutting fluids can help speed up the drilling process and prevent the drill from overheating.
- The diameter of the pilot hole varies depending on the size of the extractor you are using. Follow the recommendations on the packaging that came with the extractor.
- Be careful not to break the drill bit inside the hole, especially if drilling with a small drill bit.
Place a suitable extraction drill bit into the hole
Depending on the type of pull-out kit used to remove the bolt, the pull-out drill has a left-handed drill bit on one end and a hexagonal head or T-handle head on the other.
Remember, “tighten on the right, loosen on the left”. Since you will be using a left-handed extractor, rotate the extractor counterclockwise into the hole you just drilled. Also, since the extractor is tapered; Before choosing a T-handle or sleeve, you should first hammer it into place with a hammer.
Remove the broken bolts
At one point, you continue to use the extractor; Once the extraction drill bit is tightened, the tapered end will jam and the torque will work to loosen the bolt. Next, continue to rotate the extractor counterclockwise with a wrench or ratchet and socket until the damaged bolt is completely removed from the surface. The straight and square groove extractors must be hammered into the holes drilled in the stud to remove the stud.
Car Bolt Repair Tutorial: Make sure to time the process to prevent any further damage to the bolts. If the extractor slips and loses bite in the screw, try tapping the extractor more firmly to get a better bite of the screw. Then, push down harder as you rotate the extractor counterclockwise. Finally, enlarge the pilot hole a little and try again.
Remove the metal filler
During the extraction process, there is a chance that a small amount of metal fragments will come off the bolt. If you want to replace the bolt with a new one, make sure to remove the fine pieces. It can be easily done with compressed air or a strong magnet.
How to remove a broken bolt with a hammer
How do I remove a broken car bolt? If you want to remove the damaged bolt with a hammer, work slowly and carefully. Don’t overdo it and apply too much force.
Use a hammer to strike the part that holds the broken bolt in place. You don’t want to deform the metal, just apply enough vibrating force to loosen the rust. You can use two hammers on parts like exhaust pipe flanges, and you can reach both sides of the parts at the same time.
Place one hammer firmly against the part and slam the other side of the part with the other hammer. This helps to enhance the force exerted with the hammer without deforming the metal.
How to use the spiral coil to remove the damaged bolt
If none of the above works, then there is always a last resort: Heli-Coil. This method replaces the thread after drilling out the damaged stud. Heli-Cils may also be preferred when the bolt breaks inside the part: the bolt does not protrude from the part; It’s actually hidden in the parts.
Heli-Coil is typically sold as only a handful of inserts and mounting tools with a single thread size and different lengths. They are also available with drill bits of this size as well as kits with suitable taps.

When a bolt breaks inside a part, Heli-Coils are the best way to remove the damaged bolt.
Auto Bolt Repair Tutorial: With Heli-Coil you often need to remove parts to make sure the “new” hole you drill is perfectly straight. You also don’t want any debris to get into the engine.
First, the broken stud is drilled to a specified depth with the specified drill bit. Use the specified tap to screw this hole to the appropriate depth. Screw the Heli-Coil insert onto the tool until the bottom tab snaps into the tool.
Then, thread the insert into the bottom of the hole and twist it one last time to break off the bottom tab and remove it. The tabs have notches at the bottom that can be easily broken, but sometimes you may need to convince it with a small punch or screwdriver after removing the insertion tool. The insert must be inserted about half a thread below the surface of the head and at least half the depth of the hole.
How to remove broken car bolts: small bolts
Most of the above methods are effective for bolts that are at least 1/4 inch in diameter. Smaller bolts that you can access from the top down can use a Dremel and a small cut-off wheel to cut a slot in them so that you can use a screwdriver to remove the problematic part.
You must have clear access to the damaged bolt end and need to protrude at least 1/4 inch to give you enough space to cut into. Otherwise, you’ll weaken the part in the process, causing it to crack again and make it worse inside the stuck part.