Windows Hyper-V installation Ubuntu tutorial is introduced
How to install Ubuntu on Windows with Hyper-V? Since the launch of the Windows 10 Fall Creators Update, it has been possible to run Ubuntu natively on Windows 10. However, there are some limitations to running Ubuntu natively on Windows, such as being limited to using the command-line interface.
Hyper-V provides a built-in way to create and manage virtual machines on Windows 10. It allows you to install Linux distributions, including Ubuntu.
In this tutorial, we’ll walk through the step-by-step process of installing Ubuntu 20.04 on a virtual machine using Hyper-V on Windows 10.
Prerequisite
- Systems running Windows 10
- An account with administrator-level permissions
Hyper-V Ubuntu Installation Guide
How does Hyper-V install Ubuntu on Windows? By following the steps listed below, you can enable Hyper-V and start using it to create Ubuntu virtual machines:
Note: If you’d like to learn more about virtual desktop solutions, check out our guide to VDI environments.
Step 1: Enable virtualization in the BIOS
How to install Ubuntu on Windows with Hyper-V? Using Hyper-V requires virtualization to be enabled in the motherboard’s BIOS. The exact steps of this process will vary depending on the motherboard model.
1. Turn on the BIOS by restarting your computer and pressing the BIOS button (F1, F2, F10, F12, or Delete, depending on the motherboard model) when prompted.
2. Virtualization settings are under the CPU or Advanced BIOS Settings category, depending on your system.
Note: Virtualization settings have different names for different systems. Find items like Hyper-V, SVM, Vanderpool, VT-X, Intel Virtualization Technology, or AMD-V.
3. Once the appropriate settings are enabled, confirm the changes using the “Save and Exit” option.
Step 2: Enable Hyper-V
Windows Hyper-V Installation Ubuntu Tutorial: Before setting up a virtual machine, you need to enable Hyper-V in Windows settings:
1. Open the Windows Start Menu and select the Settings window.
2. Click on the app tile to open the app settings.
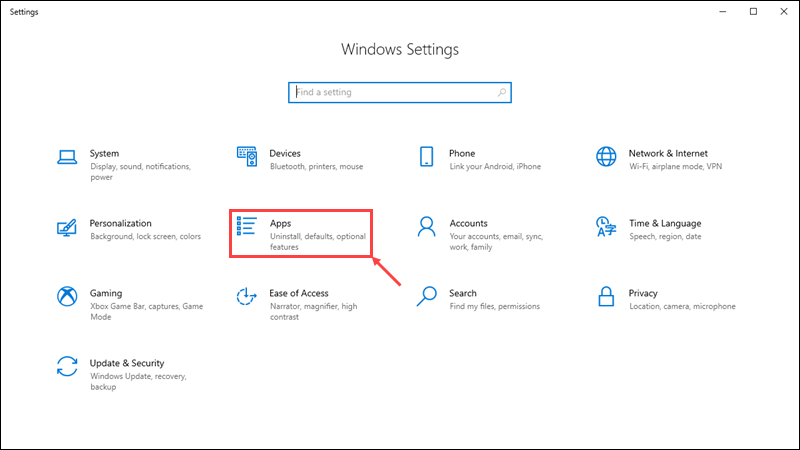
3. On the right-hand side, click on the Programs & Features link.

4. In the Programs and Features window, click the Turn Windows Features on or off link on the left.

5. Scroll down and check the Hyper-V option, as well as the Hyper-V Management Tools and Hyper-V Platform sub-options.

6. Click OK to confirm the changes.
7. Restart your computer.
Step 3: Create a virtual switch
How does Hyper-V install Ubuntu on Windows? After Hyper-V is enabled, create a virtual network switch for the virtual machine to use:
1. In the Start menu, navigate to the Windows Administrative Tools folder and open Hyper-V Manager.
2. Right-click on the system name on the left side of the Hyper-V Manager window. Select the Virtual Switch Manager option from the drop-down menu.

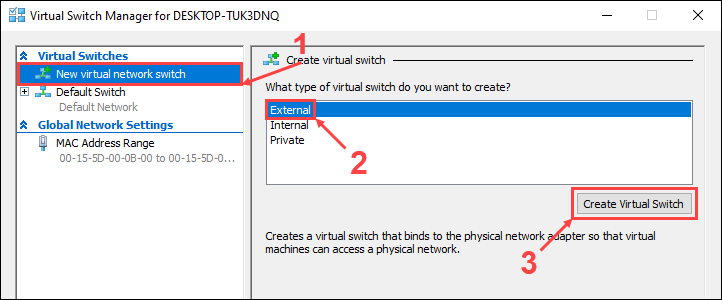
3. In the Virtual Switch Manager window, select the New virtual network switch option on the left. Set the virtual switch type to External, and then click Create Virtual Switch.
4. Enter a name for the new virtual switch. In this example, we will be using Ubuntu 20.04. Click OK to complete the setup of the virtual switch.

5. A new window may appear prompting you to apply the network changes. Click Yes to confirm.

Step 4: Install Ubuntu 20.04
How to install Ubuntu on Windows with Hyper-V? When creating a new virtual machine, Hyper-V provides two options:
- The Quick Create option allows you to use a wizard to automatically download the operating system and install it on the virtual machine.
- You can also manually set up a new virtual machine and install the operating system from a hard drive or external media.
We’ll walk through the process of installing Ubuntu 20.04 with these two options:
How does Hyper-V install Ubuntu on Windows? Quick creation
1. In the Actions drop-down menu, click Quick Create to launch the Quick Create wizard.

2. On the left-hand side, select Ubuntu 20.04 from the list of operating systems.
3. Windows Hyper-V Installation Ubuntu Tutorial: Click on the More option to set the name for the new virtual machine, and then select Ubuntu 20.04 Virtual Switch in the network menu.

3. Click Create Virtual Machine to begin the setup process. Hyper-V will automatically download and install Ubuntu.

4. Once the installation is complete, use the “Connect” button to start the virtual machine or use the “Edit Settings…” button to change the settings.
How does Hyper-V install Ubuntu on Windows? Manual installation
1. Before you start setting up your new virtual machine, download the Ubuntu 20.04 installation image from the official Ubuntu website.
2. In the Actions drop-down menu, select New and click Virtual Machine.

3. In the New Virtual Machine wizard, click Next to start setting up a new virtual machine.
4. Select a name and installation location for the new virtual machine, and then click Next to continue.

5. Select a generation for the new virtual machine and click Next.

Note: Learn about the difference between Type 1 and Type 2 hypervisors in our article What is a hypervisor.
6. How to install Ubuntu on Windows using Hyper-V? Allocate the amount of memory to be allocated to the virtual machine. Use at least 2 GB of memory and enable dynamic memory. Click Next to continue.

7. Select Ubuntu 20.04 as the virtual network switch and click Next.

8. Use the Create Virtual Hard Disk option to create a new hard disk for the virtual machine. Allocate at least 20 GB of hard disk space and click Next to continue.

9. Under the Install OS from Bootable CD/DVD-ROM option, select the image file (.iso) and select the Ubuntu image you downloaded earlier. Click Next to continue.

10. The last step provides a summary of the new virtual machine settings. Click Back to make any changes, or click Finish to create the virtual machine.

Step 5: Start the virtual machine
How does Hyper-V install Ubuntu on Windows? The new virtual machine appears in the Hyper-V Manager window. Right-click on the virtual machine name and click Connect to start it.

Windows Hyper-V Install Ubuntu Tutorial Conclusion
How to install Ubuntu on Windows with Hyper-V? After following this tutorial, you should have Hyper-V enabled and a new virtual machine installed with Ubuntu 20.04 installed.