Read this article to learn some potential solutions to fix the Windows 11 camera not working issue.
Nowadays, webcams are one of the most accessed tools on PCs, and any kind of interference is intolerable. And, it is really annoying to face the issue of webcam not working on Windows operating system. In addition to this, a lot of Windows 11 users have recently complained about the bad or incorrect behavior of their cameras. Whether it’s HP, Dell, or Asus, there are problems with laptops of every label. Especially after upgrading the operating system to Windows 11, this problem becomes comprehensive. However, the good news is that this problem is solvable. In this tutorial, we will discuss some tried and tested methods to fix laptop camera not working on Windows 11.
100% working solution to fix camera not working on Windows 11 PC
How to fix camera not working in Windows 11? Check out the effective solutions mentioned below to find and fix Windows 11 camera not working issue. There’s no need to try all of them, just go through each one your way and choose the one that works best for you.
Solution 1: Restart your computer
Whenever you observe that the camera is not working properly, the easiest way to make it work again is to reboot the system. However, it may sound too simple, but sometimes it solves your camera problem and works like magic. So, if you haven’t tried it yet, you should definitely give it a try.
Don’t worry, if that doesn’t work for you, there are many other solutions you can try.
Solution 2: Check the physical switch
Workaround for Windows 11 camera not working: Many laptops or external cameras come with a physical switch to turn the camera on or off. So, if the switch is off, you won’t be able to access the camera. Therefore, it is best to check if there are any buttons or physical switches on the system for the camera. If there is, then just make sure that it is enabled.
Solution 3: Use another USB port
How to fix camera not working in Windows 11? If you’re using an external camera, just make sure it’s securely connected. You can also consider unplugging the external camera and plugging it back into the port. Sometimes, your USB port is also the problem, so you can also try connecting the camera to another port. This may solve the problem.
If this doesn’t deceive you, check out the other solutions mentioned below.
Solution 4: Update your camera drivers
Workaround for Windows 11 camera not working: If your camera driver becomes unresponsive and is lost or out of date, then your camera won’t work as expected. Therefore, you should keep your camera driver up-to-date at all times to ensure that it runs smoothly on your PC.
Users can manually update their outdated camera drivers by visiting the manufacturer’s official website. Later, find the correct driver installer based on your Windows OS version and follow the on-screen instructions to install it. However, if you don’t have the time, patience, or good computer skills to install the drivers manually, then you can automate the same task with Bit Driver Updater.
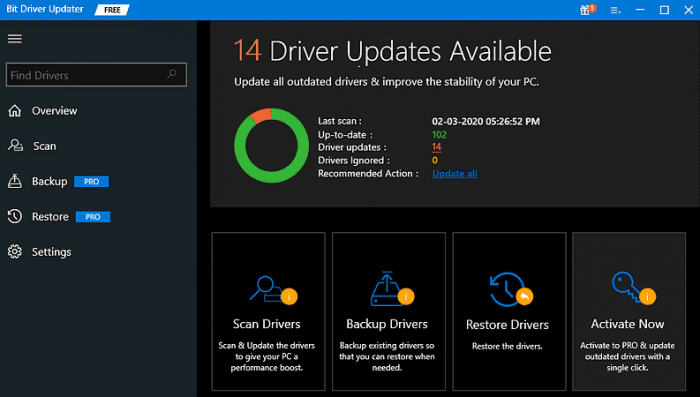
Bit Driver Updater is a driver update utility used by millions of PC users around the world. The Driver Updater will automatically detect your system and discover relevant drivers for your camera. Plus, you don’t need to know exactly what version of the operating system your PC is running. There is no risk of downloading and installing the wrong driver. Bit Driver Updater will take care of all the work for you. Here’s how to update outdated drivers using Bit Driver Updater:
Step 1: First, free download the Bit Driver Updater by clicking the button below.
Step 2: Next, open the downloaded file and follow the installation wizard to complete the process.
Step 3: After that, launch the Bit Driver Updater on your PC and then click on the “Scan” option.
Step 4: Wait for the driver updater to find the driver that needs to be updated.
Step 5: And then, click on the Update Now button next to the driver that you want to update. You can also click the Update All button. This will let you update all outdated drivers with one click.
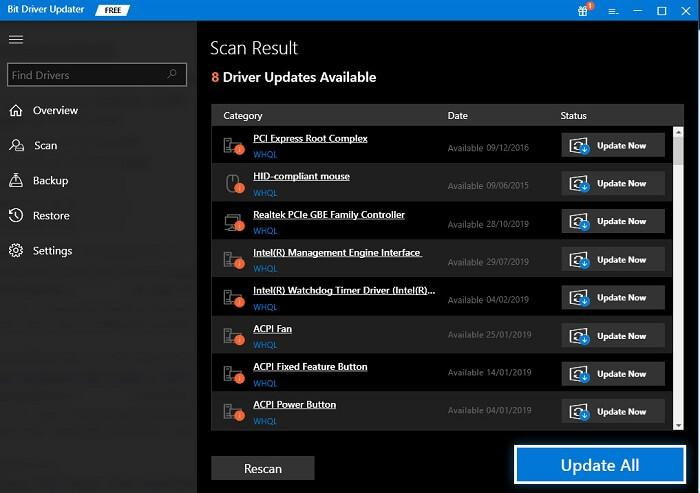
However, this requires you to upgrade to the pro version of Bit Driver Updater. In addition, the pro version comes with 24/7 technical support and a 60-day full money-back guarantee.
After updating your camera or other drivers, restart your PC and try to access your camera to test for the issue. If the problem persists, move on to the last resort.
Solution 5: Reinstall the camera driver
How to fix camera not working in Windows 11? Last but not least, you can also try reinstalling the webcam driver to fix the webcam not working on Windows 11. Because sometimes, a corrupted camera driver can cause the camera to malfunction. To reinstall the camera driver, you need to first uninstall the currently installed version of the camera driver. Here’s how:
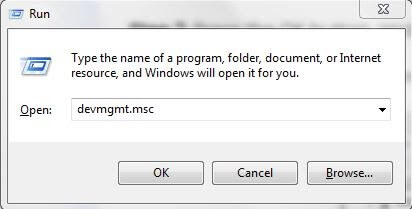
Step 1: Press the Windows + R keys all the way down your keyboard to open the Run Dialog Utility.
Step 2: Next, write devmgmt.msc in the box and click on “OK”.
Step 3: In the Device Manager window, locate and double-click on the camera or imaging device to expand its category.
Step 4: Click on the right side of your camera and select Uninstall Device from the context menu list.
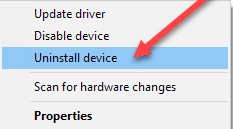
Step 5: Click Uninstall to confirm your action.
Wait for the process to complete successfully. When you’re done, restart your PC, and now Windows will automatically find and install missing or damaged camera drivers for your device.
Summary of the solutions for Windows 11 camera not working
We hope the above solutions can help you fix your Windows 11 camera, not work issues. Please leave your questions or further suggestions in the box below. Was this tutorial guide helpful? Want to read more tech-related blogs or articles? If yes, please subscribe to our newsletter.